Editor’s note: The following tips are excerpted from Survival Hacks: Over 200 Ways to Use Everyday Items for Wilderness Survival by Creek Stewart.
Having taught survival skills to thousands of individuals from all over the world for nearly two decades, I’ve come to one conclusion: the most important survival skill is innovation. Using what you have, to get what you need, is what will ultimately make the difference between life and death in a sudden and unexpected survival scenario. I often call this “survival hacking.”
Over the years, I’ve learned (and sometimes invented) some very interesting survival hacks that I think everyone should know. Why? Well, it’s like I always say: “it’s not IF but WHEN.” Below are a few survival nuggets for the when.
Framework Collar Connector
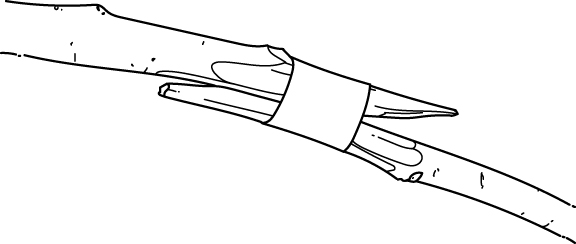
If you need a long pole, you’ll often have to lash together two limbs or saplings to get the right length. This is the case when making a dome framework for wigwam-style shelters, for example. If cordage is in short supply, using an energy shot bottle (like a 5-Hour Energy or similar product) from your trash may be the solution. After slicing off the top and bottom of the bottle, a very strong cylindrical tube remains. You can use this tube as a collar for connecting the ends of two limbs. Taper the ends of the limbs so they slide into the tube opposite each other and form a snug fit when wedged together. This collar will hold them surprisingly well and will not stretch with moisture, as many lashings do. If the collar is a bit loose, heat it over coals or a flame and it will shrink and tighten the fit.
Blanket Chair
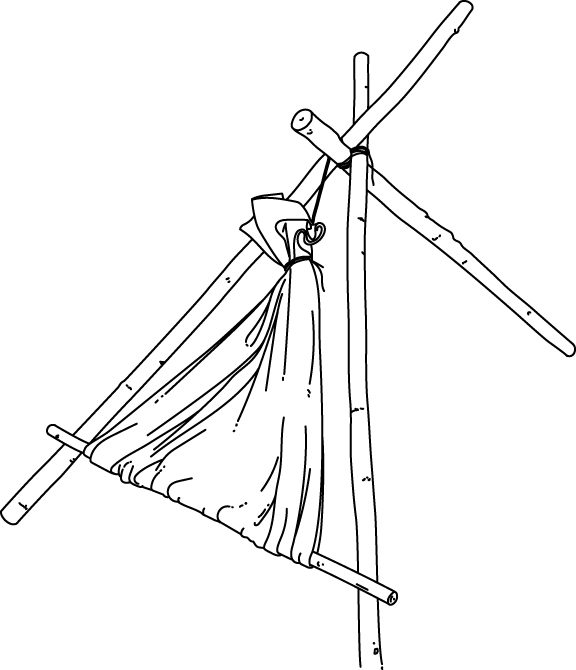
Finding a good place to sit in an improvised survival camp can be very frustrating — especially when the ground is wet or snow covered. This hack improvises a very comfortable seat in just a few minutes. The only parts you need are four sturdy poles and a blanket or scrap piece of durable fabric. Cut three poles that are 6′-8′ long by 1″-2″ thick, and then cut a fourth that is the same thickness and 4′ long.
Connect two of the long poles together at one end using a bipod lashing. Fold the blanket or fabric in half, bunch the end together, and suspend this end with rope from the cross at the bipod lashing. Insert the 4′ pole in the unsecured fold of the blanket so that it sticks out at both ends, and rest it against the longer poles. Finally, kick lash the last long pole in the center as a support, and lean back to relax.
Condom Canteen
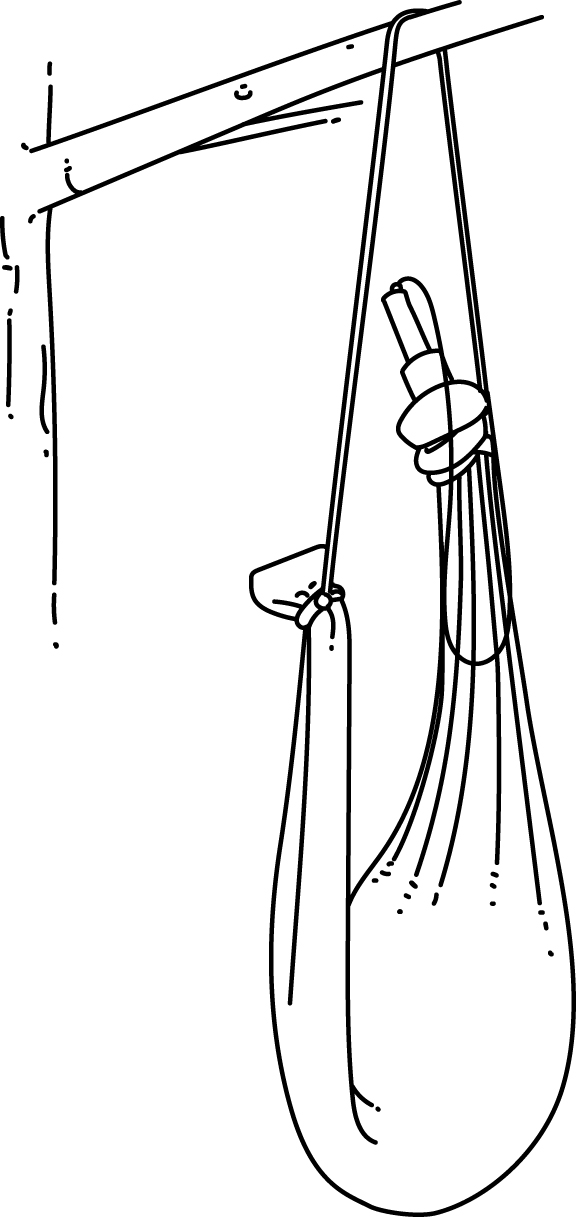
Many survivalists, including myself, suggest packing non-lubricated condoms in survival kits. They are small, compact, and inexpensive, and have a plethora of survival uses. One noteworthy function is as a compact emergency water container. Here are a couple tips I’ve learned from experience for using a condom as a canteen:
- Fill the condom in a sock to protect it during travel.
- Use any rigid hollow tube such as an ink pen, elderberry branch, or bamboo section as a spout and secure the base of the condom around it using duct tape or paracord.
- Carve a spout stopper from any dry branch.
- Add a sling, and you’re ready to make tracks with more than a liter of drinking water.
2-Liter Rain Collector
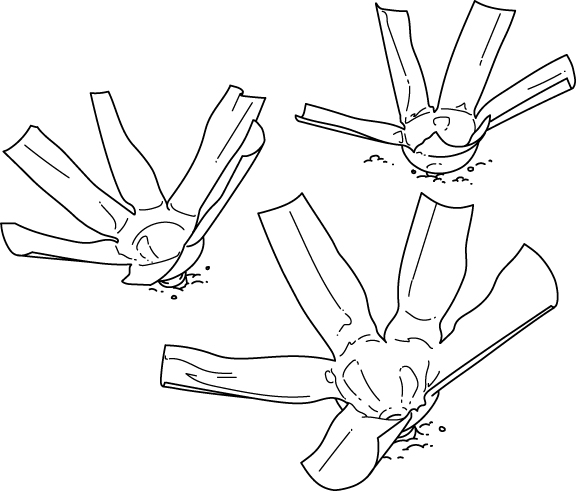
The ability to collect rainwater, especially if stranded on an ocean island, is critical. Luckily, that task can be easily done with just a plastic bottle (be sure it has a cap; the mouth must be sealed). Start by cutting off the bottom of the bottle. Next, cut vertical slices 1″-2″ apart up the side of the bottle, starting at the bottom and going a little more than halfway. Fold the sections out, giving the bottle a flower-like appearance. (Using heat during this step makes the bottle more pliable and speeds up the process; it also helps keep the petals in place once finished.) Finally, plant the top of the bottle a couple inches into the ground and wait for rain.
This water collector is modeled after nature itself — the leaves on many plants and trees help funnel rainwater toward the main stem or trunk. These plastic “petals” help to funnel water into the central reservoir. The water can then be drunk with a straw or piece of hollow reed grass, or poured into a canteen.
Match Feather Stick

If you’ve studied survival or bushcraft very long, chances are you’ve heard of “feather sticks.” With a sharp knife, you shave long wood slivers down the side of a stick. Just before a sliver is completely shaved off, you stop and begin another sliver from the top. After several minutes’ work, you’ll have a stick covered in feather-like wood shavings. These shavings catch fire much quicker and easier than the larger solid stick. Consequently, feather sticks are an excellent and easy fire starter that’s found in nature.
Let’s take that concept a step further and apply it to wooden matches. In extremely difficult conditions, when you might need additional help starting a fire, use your knife to shave small wooden slivers just above the match head, creating a mini feather stick. When the match ignites it will very quickly catch these shavings on fire, which will create a stronger and bigger flame.
Jumper Cable + Pencil = Fire
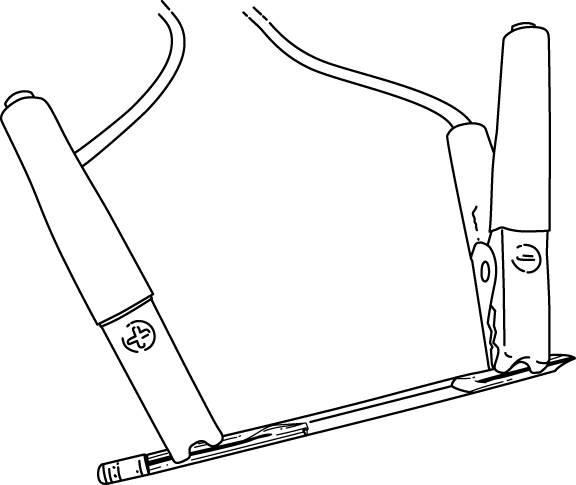
Using a battery power source is a very popular firestarting method. There are many different ways to do it using many different types of batteries. This one involves using a car battery, jumper cables, and a regular No. 2 pencil. Start by shaving down an area on each end of the pencil to expose the lead. Then clamp on the positive and negative jumper cable clamps, one on each shaved area. Be sure the clamps are touching the pencil lead. Place the clamps and pencil on top of your tinder bundle, clamp the other ends of the cables to the car as you normally would, and turn on the engine. The electricity from the cables will turn the lead into a red-hot ember and the wooden pencil will erupt into flame in about 2 minutes’ time. Use the flame to ignite your tinder bundle.
9-Volt Razor Hack
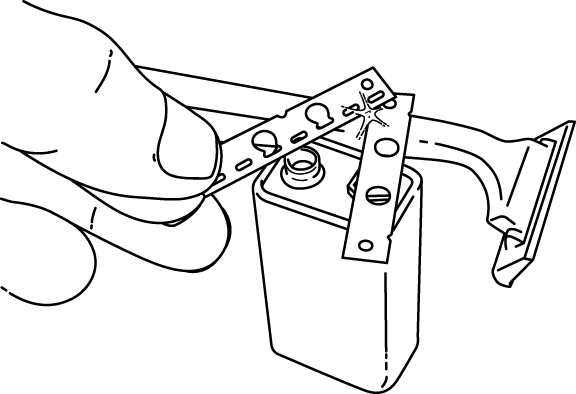
As mentioned above, batteries can be used in all kinds of different ways to make fire. Another way is using the very thin blades from a disposable razor to short-circuit a 9-volt battery. A tiny spark will fly when a blade touching the positive terminal is crossed with a blade touching the negative terminal. The correct tinder at this intersection, such as char cloth or thin shreds of tinder fungus, can be ignited with little effort.
You can use nearly any metal or wire to short-circuit a low-voltage battery, but it must be extremely thin in order to deliver positive results. Also keep in mind that repeated attempts can drain the charge from your battery source.
Mylar Emergency Survival Blanket Lens
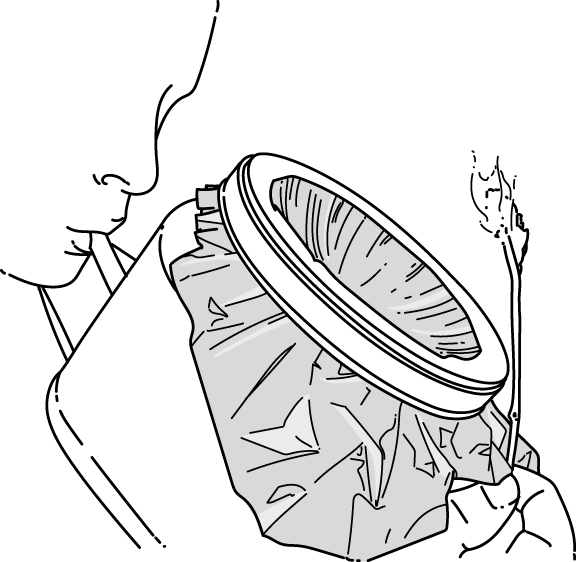
Yet another fire-starting method involves harnessing the sun’s rays using a Mylar blanket, a container with a plastic snap-on lip, and a hollow tube or ink pen. First, trim out the interior of the plastic lid so that it is just the rim that snaps onto the container. This circular rim will tightly hold a piece of Mylar placed over the top. Pierce a hole in the side of the container and insert a hollow tube or ink pen. This allows you to suck the sealed Mylar into a convex parabolic shape that can create a solar ember in direct sunlight on suitable tinders such as punky wood, agave pith, deer poo, char cloth, and tinder fungus (chaga).
The Fire Pick
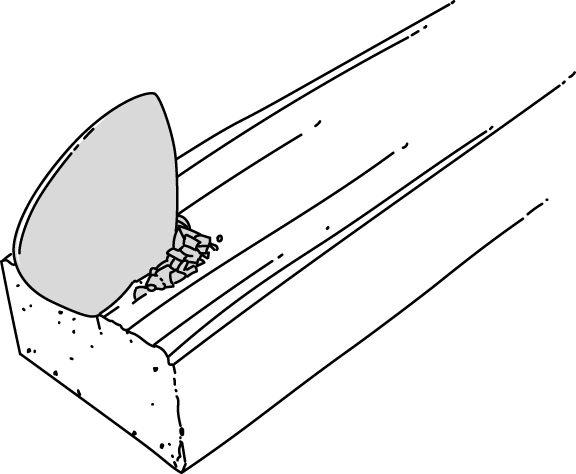
Did you know that guitar picks make incredible fire tinder? They are made from a material called celluloid, which happens to be extremely flammable. For this reason I always keep a couple in my wallet as emergency firestarter. They will ignite when exposed to an open flame such as that from a disposable lighter or match.
However, you can also ignite them with just a spark. Start by carving a small divot in a piece of wood or stick about half an inch in from the end. Then, split the stick on that end, all the way into the divot. Next, using your knife, fill the divot with shavings from the guitar pick, which you make by scraping your knife at a 90-degree angle against the pick. Finally, slide the pick into the split until the edge of it is buried in the shaving-filled divot. Now you can ignite the small shavings using a spark from a flint rock or ferro rod (a manmade, flint-like metal), and they will in turn ignite the pick. Voilà — fire with a guitar pick!
Gum Wrapper Fire
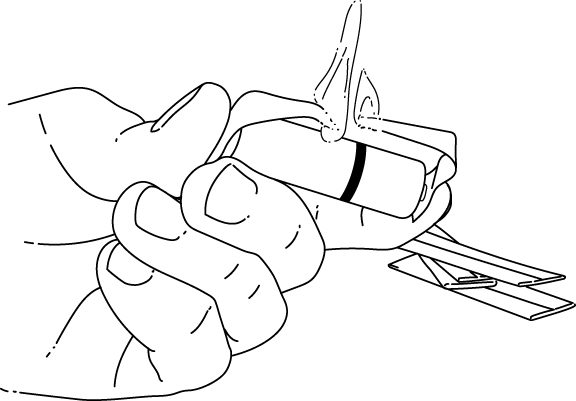
A foil-backed gum wrapper (or any foil-backed paper candy wrapper) can be used to start a fire if you have a battery source, such as a AA battery from a flashlight or remote control. Start by trimming the wrapper to an hourglass shape. Simultaneously touch the positive and negative terminals of the battery with the foil side of the wrapper. The electrical current will converge on the thinnest part of the hourglass shape and ignite the wrapper to flame. If the battery is too weak to bring the wrapper to flame, consider adding a second battery for more electrical current. Be sure to have a good tinder bundle ready because you’ll only have about 3 seconds of flame!
Ramen Noodle Stove
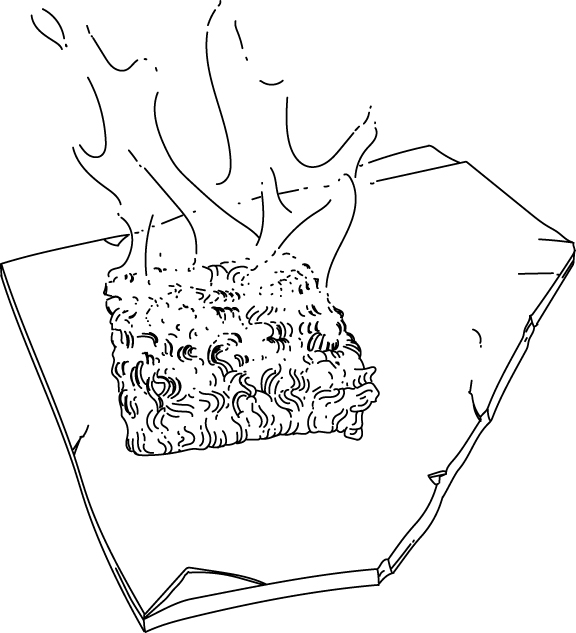
I love items that do double duty. Ramen noodles are not only a lightweight pack food, but they can also serve as a great little cooking stove in a pinch. All you have to do is saturate the dried brick of ramen with a flammable liquid such as alcohol or HEET brand antifreeze and it will burn like a solid fuel puck for up to 20 minutes per side. The dried ramen noodles help to control the rate of fuel vaporization. Build a makeshift frame to balance a pot and cook away!
It helps to soak the ramen brick in one of the fuels mentioned above for a while before use, but it isn’t necessary. A standard yellow kitchen sponge also works in nearly the same way and makes a handy little impromptu stove when soaked with alcohol or HEET.
Paracord Fishing Fly
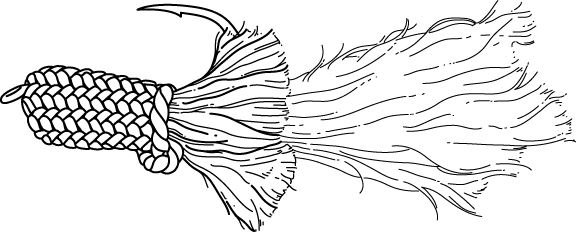
One of my students showed me this hack several years ago, and I’ve tested it time and time again in the fishing pond at Willow Haven. Slide a 1″ section of paracord over a bare fishing hook to make a very appealing fishing fly lure. Fluff up the end over the hook for disguise and then heat the other end with an open flame to melt and weld it just below the eye where the line attaches. Live bait is always best, but when live bait isn’t available you’ll never miss an inch of paracord from your shoelaces or bracelet. This improvised fly lure also floats very well for top-water bluegill and bream fishing.
Spoon Broadhead
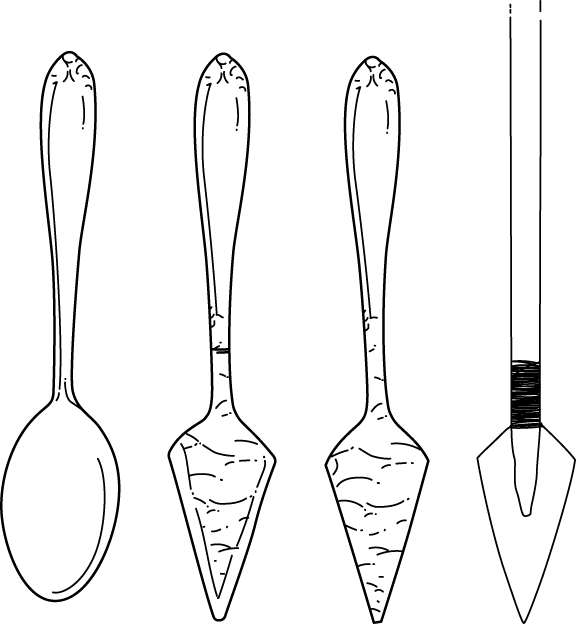
Whether you’re hunting with bow and arrow or a spear, it’s always better for it to be tipped with a sharp metal broadhead. Believe it or not, you can use something to kill your food that most people use to eat their food — a spoon! As you can see in the illustration, the evolution of a regular spoon to a killer broadhead is a simple process. Pound the spoon flat with a rock or hammer. Next, file the edges down to a point, using a standard metal file that can be found in almost any auto repair shop or garage. Finally, snap off the handle at the base with repeated bending, and lash the finished point into a split at the end of an arrow with any kind of cordage.
Slingshot Whisker Biscuit
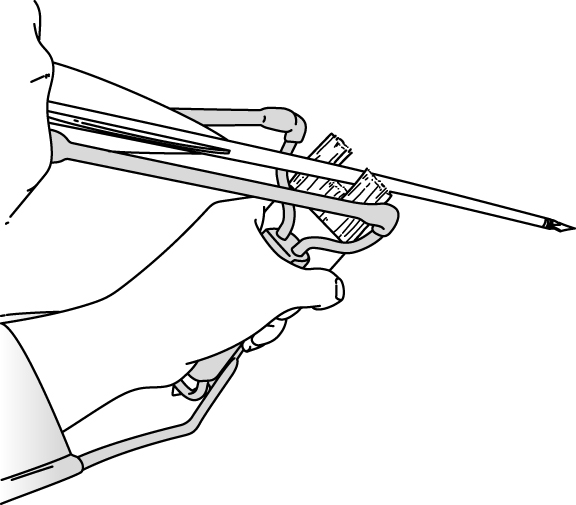
Any slingshot can quickly be converted into an arrow-shooting sling bow with one very simple addition — a paintbrush. Cut a .5″-wide depression from the bristles of a 2″-wide paintbrush to create a perfect whisker biscuit cradle for a full-sized hunting arrow. The cut notch in the paintbrush bristles will create an arrow rest, and the arrow fletching will slide through the bristles without hesitation. Pinch the arrow nock in the slingshot pouch, pull back, aim, and fire. Although the brush can easily be taped in place, a Velcro strap makes putting it on and taking it back off a breeze in the field.
Bra Cup Debris Mask
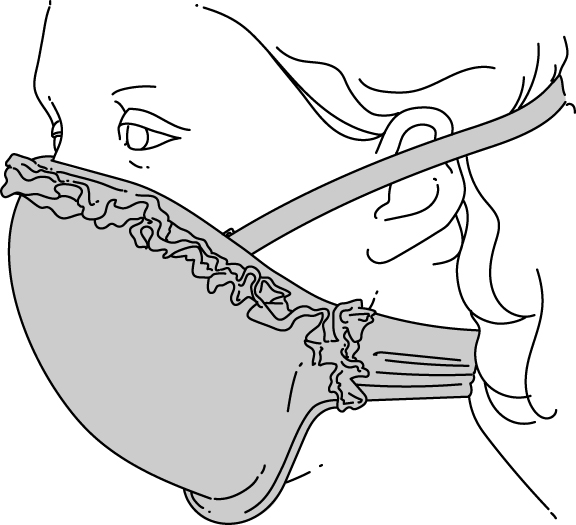
Toxic ash and debris can be a serious problem during natural or manmade disasters. Breathing in ash, pulverized concrete, and debris particles can slow you down as well as result in severe long-term conditions such as asthma and lung cancer.
Most women carry two emergency debris masks on their person at all times — a bra! The padded cups of most bras fit perfectly over the mouth and nose and can act as a crude debris filter in an emergency. The combination of foam, padding, and two layers of fabric is much better than most store-bought masks. You can even rework bra straps and ties to hold the mask securely on your face for hands-free travel.
Makeshift Butterfly Bandage

I learned this particular hack from an Army field medic while taking a wilderness first-aid class a few years back and thought it was great. Bandages are a luxury in a survival scenario, and you want to make the best possible use of them when necessary. And especially on the hands, fingers, and knuckles, traditional bandages just don’t work that well. To make them more flexible and adaptable, cut a center slice through each of the adhesive strips long-ways, from the ends up to the bandage portion. Now, with four adhesive strips instead of two, you can apply the bandage more effectively to stubborn body parts.
A Not-So-StrAWEful Tick Puller
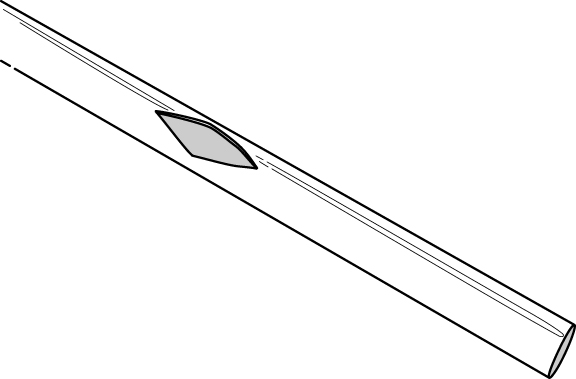
Ticks are nasty critters and the bane of many a woodsman. The best way to rid yourself of ticks is to pinch the head with tweezers and pull upward with steady, even pressure. In the absence of suitable tweezers, make a tick puller from a plastic drinking straw. Using a knife or scissors, cut an eye-shaped hole toward the end of the straw, large enough to fit over the tick’s body. The outside tip of the eye cut (the side closest to the edge of the straw) should come to a very fine point. Slide the eye over the tick and pull from the side, wedging the tick’s head and neck in the corner of this fine-cut point. Steadily pull until the tick detaches, and then wash the affected area with soap and water.
Bullet Casing Whistle
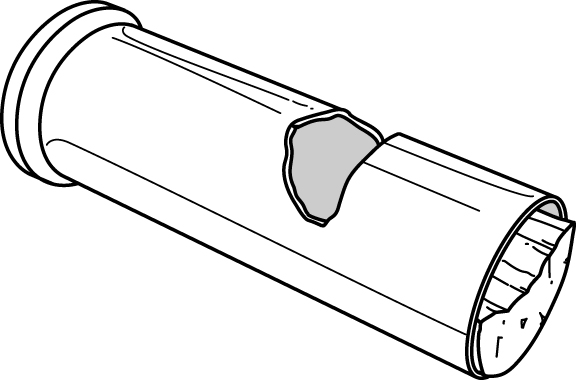
Using just an empty bullet casing, a file (or sharp corner of concrete), and a branch, you can make one of the best makeshift rescue whistles in the world. File a groove .5″ from the opening of the bullet casing as shown in the illustration. Be sure that there is a flat 90-degree portion toward the open end. Next, carve off the top fifth or so of a branch that is the same diameter as the inside diameter of the bullet casing. Cut this piece so that it is the exact length from the opening to the 90-degree, flat-filed edge and insert it into the end of the casing as shown. This bullet will now produce a piercing whistle to signal for recue.
Conclusion
Your imagination is your only limit when it comes to emergency survival scenarios. I am amazed every day at the creative survival solutions and ideas that I see from friends, students, survival enthusiasts, and fellow instructors. Remember, it’s not IF but WHEN.
Listen to my podcast with Creek about survival and prepping.
_____________________
For more jerry-rigged and improvised devices that would make MacGyver proud, check out Survival Hacks: Over 200 Ways to Use Everyday Items for Wilderness Survival by Creek Stewart. Stewart is the Senior Instructor at the Willow Haven Outdoor School for Survival, Preparedness & Bushcraft and his passion is teaching, sharing, and preserving outdoor living and survival skills.


