Editor’s note: This is a guest post from Jerred Moon.
Want to expand your repertoire of handyman skills and get in the best shape of your life all at the same time? Then you, my friend, need to make your very own DIY Prowler. Never heard of a Prowler? Let me tell you what sort of workout you’ve been missing out on first, and then I’ll show how you can make your own with some 4x4s, pipe, and brackets.
What Is a Prowler?
A Prowler is basically a sled that you stack weight on and push around for exercise. But the Prowler isn’t just another push or pull workout sled. The different variations and workout combinations you can perform with a Prowler are almost endless, making it an amazing strength and conditioning tool.
Depending on which variations and movements you use, the Prowler is great for conditioning and endurance workouts or for strengthening your core, arms, and lower body. There aren’t too many conditioning tools that exist in this world that have the power to work your whole body like the Prowler. A few quick intervals with this thing and you will feel like you ran 5 miles and completed a load of heavy squats.
The Prowler was made popular by some of the world’s top strength training coaches like Dave Tate and Louie Simmons. These coaches learned that any lifting program, if not coupled with appropriate muscle conditioning, prevents athletes from reaching their full potential. Athletes that want to compete at an elite level will need an elite level of conditioning to get through their training.
With CrossFit exploding in popularity, we have seen a huge shift in the world of fitness. Movements and lifts that were once reserved for Olympians and powerlifters are now being performed by your average CrossFitter. And equipment that was once used only by elite athletes (like the Prowler) are being incorporated into the fitness regimens of more and more average folks.
The problem with some of this cool new fitness equipment is that it can cost you an arm and a leg. For example, buying a heavy duty Prowler will run you anywhere from $250-$800 at most fitness stores. But with an investment of just 50 bucks, you can build your very own this weekend.
Alright, enough chit chat. Let’s start building your Prowler.
Step 1: Go Shopping
Now, before you run out and buy everything on the list, make sure you read through this entire article first. I left some things optional. This could make your project easier or cheaper depending on your specific situation. The items on the equipment list with a star have options.
Materials List:
- (2) 8’ 4×4’s
- (1) 10’ metal conduit pipe 1 1/4” in diameter* (or other pipe options that do not involve cutting)
- (10) 5/16” lag screws 6” (1 extra just in case)
- (1) box of flat edge screws 1-1.5”
- (1) 2’ PVC section 4” diameter* (other options available)
- Masonry Circular Cutoff Blade for cutting metal and PVC* (only if you plan to cut the pipe yourself)
- Brackets
- (2) 6” flat brackets
- (2) Hurricane bracket straps
- (6) 90 degree brackets
- (4) 45 degree brackets (adjustable angle)
Step 2: Cutting the 4×4’s

First, we will be cutting the 4×4’s for the basic pieces we will use to make the sled. This step includes a majority of the 4×4 cuts; however, there will be more cutting later.
Cut the following:
- (1) 43″ piece (used for T-shape)
- (1) 36″ piece (used for T-shape)
- (3) 7″ pieces (used for the “runners” on the bottom of the sled)
- (2) 8.5″ pieces (used for support on top of the sled)
Step 3: Boring Holes

We’ll be boring 1-1/2″ holes in the 4×4 for our pipe. To do this job, you’ll need a 1-1/2″ hole boring drill bit.
Bore the following holes:
- 36″ piece – 2 holes. Each hole should be 7″ from each end.
- 43″ piece – 1 “half way-hole.” Hole should be 29″ from one end. DO NOT DRILL ALL THE WAY THROUGH!!
- Two 7″ pieces – Bore a hole halfway through directly in the center. DO NOT DRILL ALL THE WAY THROUGH!!
- Two 8.5″ pieces – Bore a hole 2” from all the way through.
Step 4: Pipe Cutting

Wow, fire! Don’t be scared of some sparks. However, if you do feel uncomfortable cutting pipe you may want to buy the pre-cut galvanized pipe. Yeah, I cut it in the dark for a cool effect. Don’t try cutting in the dark at home!
A few notes: The pipe I used is a 1-1/4″ conduit pipe that comes in 10′ sections. It’s easy to cut and super cheap. It’s plenty strong for this project too. If you don’t want to cut pipe, you can buy the smaller sections of galvanized pipe, but it will cost more. You can purchase a skill saw blade that cuts conduit pipe for $2-$3.
Cut the following:
- (2) 43″ pieces
- (1) 18″ piece
Step 5: Putting It All Together and Bracing
Now we take all of your pieces and put them together, and add brackets and some wooden braces.

First, we will seat the pipes through all the wood. Take two 43″ pieces of pipe and thread them through both holes on the 36″ and two of your 7″ wood pieces. This may take some tapping on the pipe to get it through. If so, use a piece of 4×4 on top of the pipe and then use a hammer on top of the wood. This will keep the pipe from getting damaged.
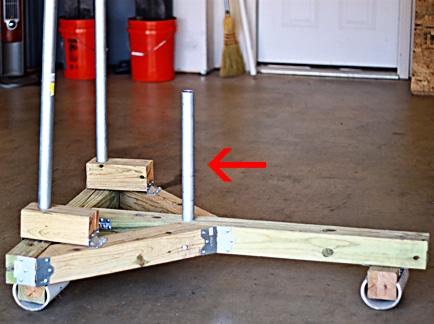
Next, put your 18” pipe through the “half-way hole” on your 43” piece of 4×4 (See arrow on my completed sled). This is where the weight will be held. Once the project is complete, I recommend putting a tennis ball or racquetball on top of the pipe for safety.

Next, we will secure the T-shape. The top of the T is your 36″ 4×4. Place the 43″ 4×4 perpendicular to the 36″ 4×4 to form the T-shape. Fasten the two beams together with two hurricane brackets and two 6” bolts as shown above. One hurricane strap goes on top and the other will go on the opposite side and on the bottom. This will secure and minimize any torque on the T-Shape. The bolts will be 45-degree angles from one another. Note: Pre-drill a hole then screw in the bolt.

Now we have the basic structure and it is time to add braces. You will need to cut two 24″ pieces of 4×4 at an angle that will fit your sled.

After cutting the two brace beams, secure them with bolts. (Note: In the picture you’ll notice I have the brackets screwed on. I took this picture after I completed the project. We haven’t gotten to bracket installation yet.)

Now secure the third 7″ runner piece to the bottom 43″ 4×4 towards the end. Screw in a 90 degree bracket on each side of the 7″ runner piece Note: pre drill hole.
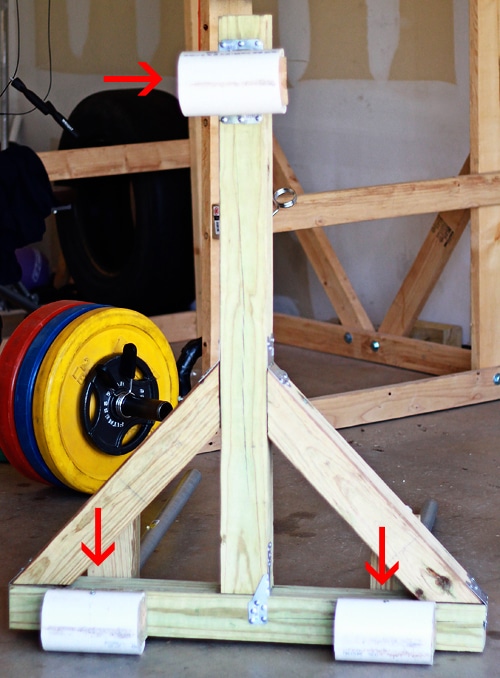
Here’s where and how the three 7″ runner pieces are placed on the bottom of my prowler. (Ignore the PVC pipe. We’ll be adding that in a bit.)

Flip your Prowler so it’s resting on the runner pieces. Slide a 8.5″ 4×4 down the pipe (outlined in orange) Add a flat bracket to connect the 8.5″ and 36″ 4x4s (Arrow #1). Add a 90 degree bracket between the 8.5″ and angled 24″ 4x4s (Arrow #2). Add a 45 degree adjustable angle bracket to connect the 36″ and 24″ angled 4x4s (Arrow #3). Repeat on the other end.
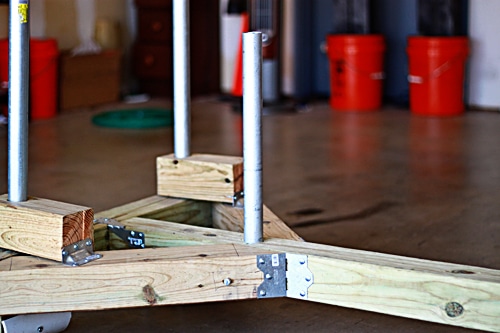
Your sled is basically complete. All we need now is a surface for it to glide on.
Step 6: PVC Cutting
I used PVC on my 7″ runner pieces, and it has worked out great. However, I only use my sled on grass. I like the PVC because it’s easily replaceable if it breaks or gets worn. You can really get creative here. You could use a bucket cut in half to secure to the bottom or you could use those hard plastic furniture movers. I am currently using PVC and am enjoying it, but I may try some other material in the future. Just keep that in mind.

Put the 4×4 at the edge of the PVC to measure the width for your cut. Add tick marks where the wood meets the PVC edge. Draw a perfectly straight line down the edge of the PVC. These will be your cut lines.
After you have the center cut out, you will then cut the PVC into three 7.5” pieces.

Take your 3 PVC pieces and slide them on the wood runners. Pre-drill a hole in the PVC and into the wood. Secure the PVC to the wood with flat screws, the longer the better (See arrow)

Now you have a fully functional sled!!!
Now Go Use It!
_____________________
Need help with this project or want to see some different garage gym DIY projects? Check out End of Three Fitness for a full list of garage gym DIY projects and other information. Jerred Moon at End of Three Fitness is helping people like you change their view of fitness; he didn’t start the revolution but he plans to finish it!


