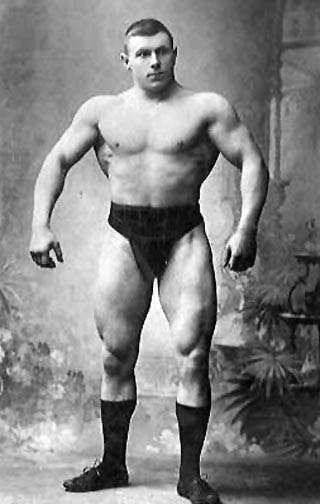
At the turn of the 20th century, the world saw the rise of a new kind of public hero: the professional strongman.
Strongmen emerged from the physical culture movement that had been building during the 1800s, and was itself a response to the Industrial Revolution. With the proliferation of office work, there became a growing concern as to how this new sedentary lifestyle was affecting the health — and manhood — of the country’s men.
Strongmen were symbols of virility maintained — proof that citizens still had the grit, power, and strength of their pioneer forebearers and the potential for doing manly deeds. If men could no longer tame the frontier and challenge the enemies of nature, they could master themselves and pit their hardihood against the weights of a gymnasium.
Strongmen came from all over the world and from a variety of backgrounds. Some emerged from the world of professional and amateur sports and had been boxers and wrestlers or competitors in the Olympics and Highland games. Some had served as physical training officers in the military. Others had simply been blacksmiths or factory laborers who saw a chance to make a living using their brawn in a less grueling and/or monotonous way.
Strongmen plied their trade by demonstrating their strength and prowess in vaudeville acts staged in music halls and dime store museums. Lifting heavy weights as an end in and of itself was a novel enough concept that a fascinated public was willing to pay to watch muscular men heft dumbbells, barbells, and oddly shaped objects. Strongmen further spiced up their acts with stunts like breaking chains, tearing apart decks of cards, bending iron bars and horseshoes, pulling loads by their teeth, and engaging in mock gladiatorial contests.
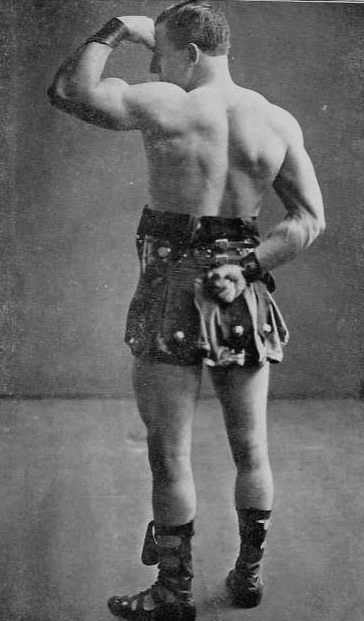
A lot of chicanery went on with these shows, with entertainers employing tricks and subterfuge to accomplish their apparent feats of strength. But there were also genuine strength athletes on the circuit, who insisted on doing their lifts and stunts by pure manpower alone.
These strongmen became not only the promoters of entertaining sideshows, but helped advance an interest in physical culture and fitness to the wider public. Men who saw strongmen perform their acts naturally wanted to know how to go home and build a similar physique themselves. Many strongmen thus created books and mail-order courses that laid out their recommended strength-building programs; these courses remained enormously popular through the first half of the 20th century, helping to launch the fitness culture that remains with us today.
Some of the suggestions strongmen gave involved classic lifts and exercises that we would still recognize (though what’s considered good form has changed over time) like the jerk, clean, and squat. Other exercises were unique and have largely been forgotten in the century since the heyday of old-time strongmen.
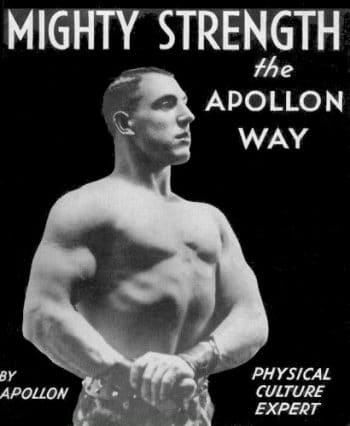
We’ve looked through a few dozen vintage strongman manuals to find the best and most interesting of these lost exercises. They look to be just as effective as they were in the days when steak and eggs were the only workout supplements available, and the singlet was a man’s go-to gym wear. Try some of these the next time your workout routine gets dull, and be sure to twist your mustache after completing each set.
Strongman Exercises
Forearms/Grip
Finger Lifts
Directions from Molding a Mighty Grip (1932) by George F. Jowett:
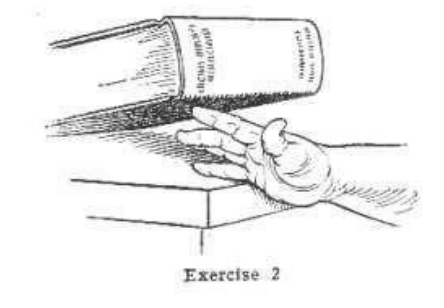
“The exercises in this book should all prove to be very interesting to every exercise fan. They savor so much of feats there is never a possibility of monotony. Take the exercise shown here, Exercise 1 (a). You will be surprised to find how weak the fingers will prove to be providing, of course, you use a book of fairly good weight. You will notice that the book is placed upon the fingers only and is not even touching the hand. Also note that the hand is not resting on the table. These two points are important. Naturally, you will understand you must use a book of sufficient weight but not so heavy as to make the exercise a strain. A straining movement has no value. It is the several properly executed movements that count. If you allow the back or the palm of the hand to rest on the table the major value of the exercise will be lost.
Notice how far the book is placed on the fingers and that the thumb has no part in the exercise. Your first effort will be to raise the volume as high as possible with the index finger as shown, Exercise 1 (b). When you have thus raised the book to your limit, lower back to the original position and employ the next finger and so on until every finger on both hands has exercised with the exception of the thumb. We will not miss the thumb – that comes later.
You may practice raising the book with each finger several times in succession before passing on to its mate. This is really a better policy.
As you pass on to the little finger you may find it somewhat difficult to juggle the book. The far side of the book may touch on the table, but do not let that worry you. It is perfectly all right as long as you feel the resistance.
When you have satisfactorily concluded the individual exercises, as just explained, try raising the book with the fingers one after the other, quickly, in the manner used to play a piano. This will create speed in your digits as well as strength.
Nimble as your fingers may be under ordinary circumstances you will find they will acquire an awkwardness when called upon to operate quickly and strongly as required in the piano movement.
If you have a volume sufficiently heavy you will find operating all the fingers of the hand at once a very good exercise also.
Finger exercises of all kinds have a very stimulating and gratifying influence upon developing the difficult muscles of the forearm which, at the same time, will naturally tend to increase the thickness of the wrist.”
Reverse Finger Lifts
Directions from Molding a Mighty Grip (1932) by George F. Jowett:
“To practice this exercise you simply reverse the position of the hand with regard to the table as the illustration shows. This will be a little more difficult to some than to others, but you must not be dismayed, the exercise is not so difficult. This exercise will bring into action the forcep muscles of the thumb and of the little finger. As these two forcep factors operate you will notice the difference in both control and power. Control will be better and power more evident.
You go through the same process as explained for the first exercise, exercising the fingers individually and quickly in piano play fashion. The only action in this exercise requiring more care than in Exercise 1 [Finger Lifts, above] is when the little finger becomes involved. As your fingers travel individually to the small finger a natural inclination will be felt to operate the thumb, commencing with the third finger and becoming more pronounced with the little finger. This last member has a certain amount of forcep action which, with the thumb, plays the major muscular action in closing the hand and gripping an object.”
Forearm Broom Extension
Directions from Molding a Mighty Grip (1932) by George F. Jowett:
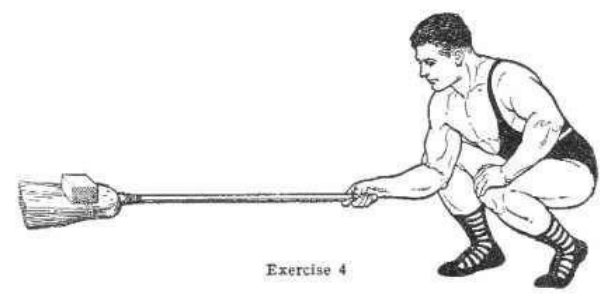
“Here is a very old exercise and test of wrist strength. Years ago it was a very common test. It is to be regretted that we do not see more of it these days. One sure thing — it will positively find the weak links in your hand, wrist and arm strength. At first practice with a broom alone. If this is too difficult when holding the end of the broom, merely move the hand down the handle and shorten the leverage. As you grow stronger move the hand grip toward the end. When this is accomplished progressively add a little weight by placing some small object on the straw end of the broom as shown. The picture illustrates an athlete raising a broom with a brick placed upon the straw end. When you become able to do this with a broom that has the regular length handle you can be well proud of your arm strength.
The broom must be in a straight line with the forearm and neither the elbow or arm must rest against or on the knee. The arm must act free and independent of any other aid or support.
A feat somewhat of this order was once a feature around blacksmith shops, the only difference being that they held sledgehammers out in a straight line with the shoulder, grasping the handle of the sledge at the extreme end. Many a fellow with a strong wrist and forearm fell down on this stunt because his deltoids or shoulder muscles were weak. Unfortunately there was no way of estimating the respective merits of these smiths with the brawny arms. Sledgehammers in the old smithies varied from 6 pounds to 12 pounds, while the handle lengths and thicknesses were rarely alike. The length and thickness of the handle is of greater importance in this case than the weight. The shorter the handle the better the possibilities of performing the feat. The longer or the thicker the handle the more difficult it is.”
Keg Finger Hangs
Directions from Molding a Mighty Grip (1932) by George F. Jowett:
“As I have remarked in this book, barrel lifting was very popular with the old-time strength athletes. For developing the fingers, hands, wrists and arms, there is nothing any better. Apart from this, barrel lifting is great for general body building. Of course, a barrel is not the handiest thing in the world to have around the house, but if a person is sincere in his search for great strength and muscular development he will always find a way to practice.
I wish to draw your attention to Exercise 5. This is purely a grip lifting exercise. Notice how the athlete is gripping the chines (the name applied to the edges of kegs and barrels). Practically speaking the only grip that can be secured is that given by the first joint of the fingers. The object is to keep the legs and the back straight and lift the barrel off the floor as high as you can. This done, replace the barrel on the floor and straighten out the fingers, then repeat the grip several times. When this is completed pass on to Exercise 6 [Keg Finger Carry, below].”
Keg Finger Carry
Directions from Molding a Mighty Grip (1932) by George F. Jowett:
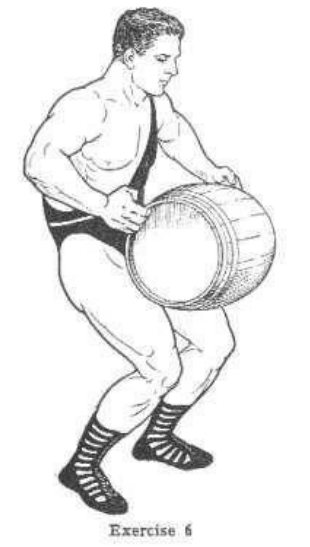
“In this case you lift the barrel up onto the thighs. This is the regular way to lift and carry a barrel. I have seen some men walk in this way carrying barrels weighing well over 300 lbs.
This calls for great strength in the legs as well as the fingers and arms. You just practice exercises five and six several times with a 100-lb. nail keg or barrel and you will be amazed at the results you get out of such practice. Remember the instructions I have given you for carrying the barrel. This is very important.”
Forearm Roll
Directions from The Way to Live by George Hackenschmidt (1935):
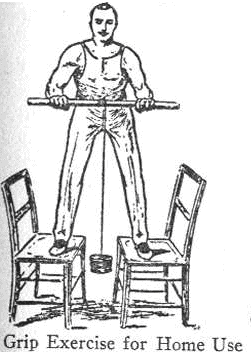
“Get a round stick, a thick broom-handle will do, although it should be from 1 in. to 1 ½ in. thick. Pierce a hole through this and suspend by a cord a 5 lb. weight. Now stand on two chairs and, holding the bar waist high, roll it round with both hands, winding up the cord. Continue until the weight is wound close up and then unwind to full length. Both wind and unwind with continuous and also with reverse rollings. Continue until tired. The rolling movement is to be always steady and gradual.”
Bicep/Triceps
Body Resistance Bicep Curls
Directions from Molding a Mighty Arm (1932) by George F. Jowett:
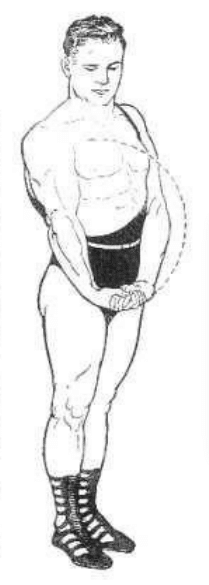
“Stand erect with feet together and clasp the left hand in the right in front of the body with the palm of the right hand facing directly forward and the arms held straight down by the sides. From this position turn the right hand on the wrist upward in a cupping motion so the space between the hand and the forearm is shortened. Now begin to bend the arm at the elbow and raise the right hand toward the right shoulder. Throughout this motion press down with all the power of the left arm to resist the upward trend of the right arm. This will bring the right arm biceps into play very forcibly in order to overcome the left hand pressure. When the right hand is curled to the shoulder allow the arm to return back to the original position, but in doing so, resist the downward action, this time by pulling up with the left hand.
Perform this exercise reversing the hands so as to develop both arms equally.
Half a dozen repetitions will give you some idea of the effect this exercise has upon the biceps.”
Isometric Tricep Extension
Directions from Molding a Mighty Arm (1932) by George F. Jowett:
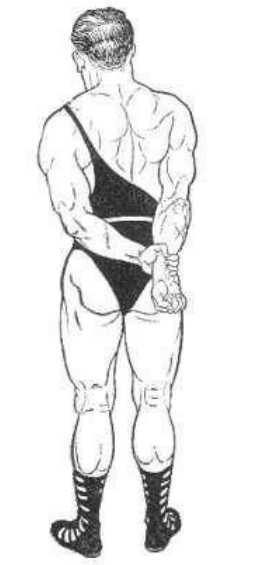
“Another triceps wakener is to grasp the wrist of the right hand by the left hand, passing the left arm across the small of the back. Stiffen the right arm and lift backwards trying to break the grip of the left hand. You will not be able to lift high but the triceps kick should be strongly felt.”
Kettlebell Tricep Extensions
Directions from Textbook of Weight-lifting (1905) by Arthur Saxon:
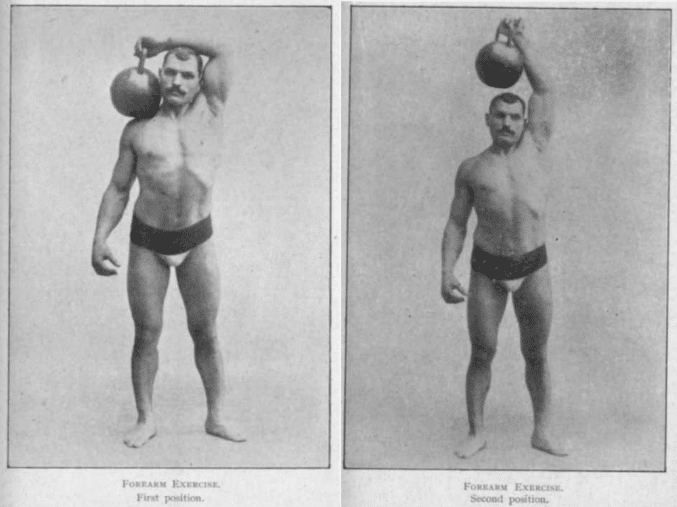
“A splendid arm exercise, particularly for the forearm muscles, is shown in an accompanying illustration. Stand as shown, with kettle-weight, say 10 lbs., resting on the right shoulder, grasped with the left hand, the left arm being bent with forearm resting on the top of the head. Now straighten arm, raising the ball over your head and replace. Repeat ten to twenty times, with either arm, increasing number of repetitions gradually to, say thirty times, then increase weight and commence afresh. The exercise may be varied by bringing the ball right over the head and resting it on the opposite shoulder, passing it all around the head, etc.”
Shoulders
Tiger’s Bend
Directions from Super Physique Body-Building Bar-Bell Course (circa 1940s) by Siegmund Klein:
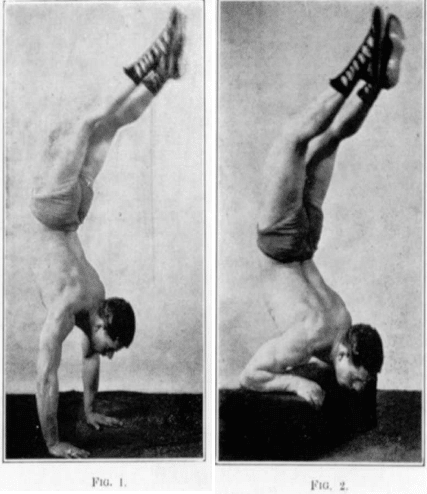
“This exercise should be practiced by all athletes who wish to excel in the ‘Two Arm Press’ lift. It will be necessary for you to be able to do a hand stand fairly well before commencing this exercise. From position in Figure 1, lower the body slowly until the elbows touch the floor (Figure 2). Swaying the body slightly forward, press up to starting position and repeat.”
Barbell Turns
Directions from Super Physique Body-Building Bar-Bell Course (circa 1940s) by Siegmund Klein
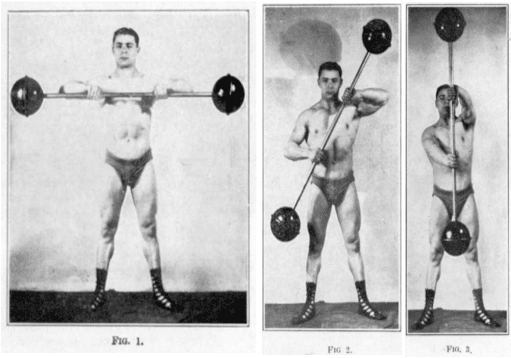
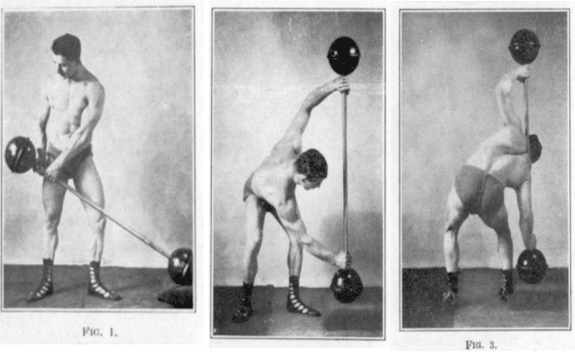
“Hold light bar-bell at the chest as in Figure 1, with feet firmly planted on the floor. Push bell smartly forward and back to chest. Then turn bell to a slight angle as in Figure 2, and push forward smartly again bringing bell back to the chest. Each time the bell goes forward turn to a sharper angle until, in five movements, the bar is perpendicular as shown in Figure 3. Inhale when pushing forward, exhale returning to chest.”
Hindu Push-up
Directions from Boxing and Physical Culture (circa 1940s) by Thomas Inch:
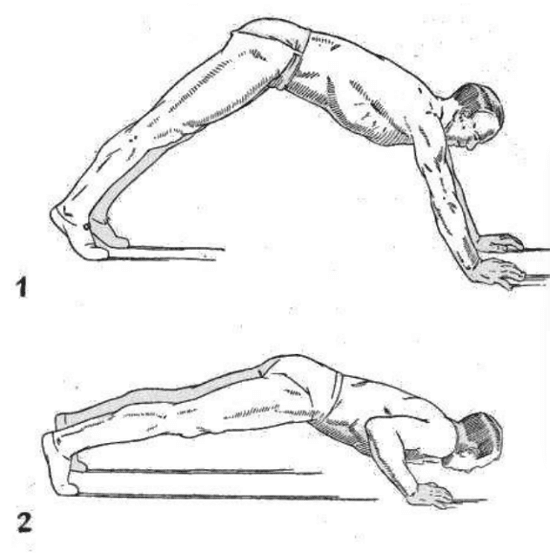
“Here is an exercise which brings practically every muscle of the body into play and, performed in the special manner I will describe, is excellent for toning up the arms and body and giving power for close-in work.
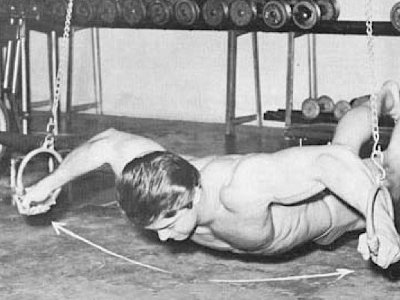
Take up your position on the floor, with the body weight taken upon your hands and feet. Before bending the arms and lowering the body until the chin touches the floor, raise the buttocks as high as possible in the air. Then lower, and when the face is near the floor drop the buttocks, hollow the back and throw the body forward, almost scraping the floor with the chest and waist, and go forward until you have pressed up by arm power and find the arms straight again. Then raise the buttocks and repeat up to twelve times.
The whole movement can be reversed for the sake of variety by starting in the forward position and lowering and working back towards the feet, and then pressing up to straight arms with hollow back as before.”
Body Resistance Shoulder Shrugs
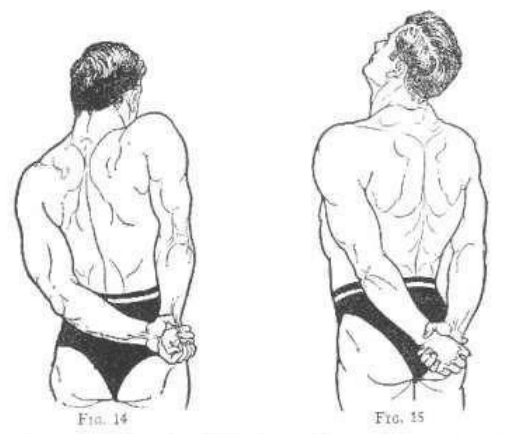
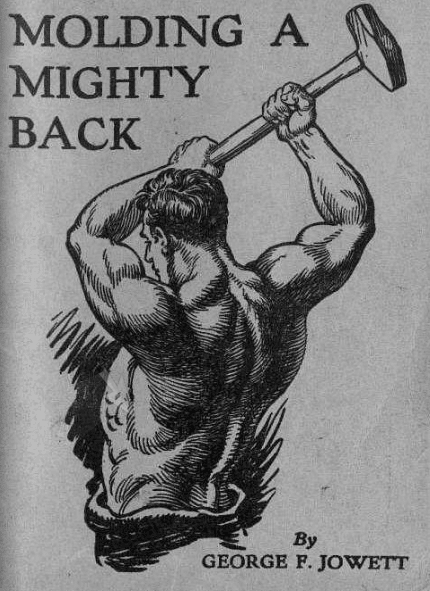
Directions from Molding a Mighty Back (1932) by George F. Jowett:
“Here is an exercise I always enjoy and one that I have practiced all my life. In fact, it was one of the first group of exercises I ever practiced. You may not care for it as much as some other, but I liked it because I could get tremendous resistance from it.
I first adopted the position of hands clasped behind the back, then drew the shoulders forward and allowed the chin to sink upon the chest. I would then tense and forcibly bring the shoulder blades together as much as I could, throwing back the head as this was done. See Fig. 15. This I would repeat anywhere from twelve to eighteen times, giving complete contraction and extension of these powerful shoulder muscles.”
Keg Clean and Press
 Directions from Molding a Mighty Grip (1932) by George F. Jowett:
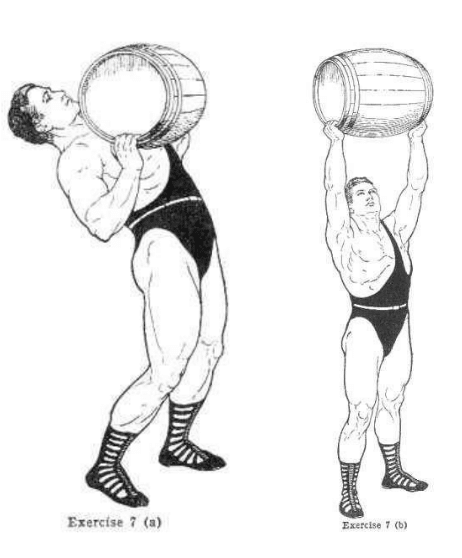
“Exercise 7 (a) shows the athlete with the barrel held at the shoulders. This is not so easy as it may at first appear. Great action of the arms and gripping muscles is necessary and a little practice will develop them to an extraordinary extent. The difficulty lies in getting the barrel to the shoulder, therefore it is very necessary that the exercise be first practiced with a small nail keg or an empty regular-sized barrel. If you employ a regular-sized barrel you will find it easier to manipulate it if you will pull the barrel in close to the body, then back, and thus aid the upward movement by allowing the barrel to roll up the body to the shoulders, Exercise 7 (a). From this point push the barrel to arm’s length overhead as shown in Exercise 7 (b). This, in addition to developing great strength, will teach you equilibrium in lifting objects overhead as nothing else will.
There are several interesting ways of raising a barrel from the ground to arm’s length overhead. One way is by what Swedish athletes term the ‘slow hang’ position. That is, you lift the barrel off the ground slowly to the position as shown in Exercise 5 [Keg Finger Hangs, above]. There you pause a moment and with a snap move to the position in Exercise 6 [Keg Finger Carry, above] and from thence to the shoulder as in Exercise 7 (a), and to arm’s length overhead as in Exercise 7 (b).
Another method is to pause as in Exercise 5 position and then in one movement sweep to the shoulders. This can be changed to sweeping the barrel from the ground to arm’s length overhead or to the shoulders only. Another movement which will stimulate powerful forces is to pause at the point shown in Exercise 5 and then in one movement sweep the barrel to arm’s length overhead.”
Single-Handed Keg Shoulder Heft
Directions from Molding a Mighty Grip (1932) by George F. Jowett:
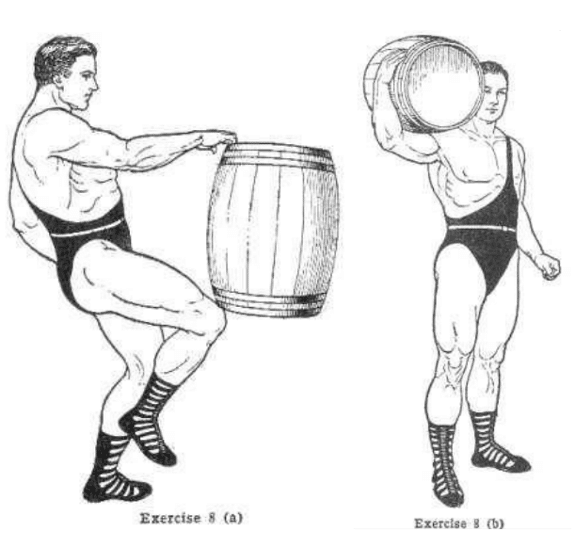
“A very difficult exercise is that of shouldering a barrel with one hand. If you asked the average fellow to do this stunt he would be stumped to know how to go about it. It is an exercise feat that requires speed, strength and perfect poise. The many muscular changes the body goes through in this process are remarkable. Some fellows are decidedly clever and strong in manipulating the barrel to one shoulder. To commence, the barrel must be rocked forward so that it is balanced on the front edge. The knee should next be inserted under the nearest edge of the barrel. Grasp the barrel and with a powerful back and arm pull, pull the barrel toward the body and at the same time toss up with the knee as shown in Exercise 8 (a). Then, immediately let go with the gripping hand and catch the barrel as it travels to the body within the fold of the elbow. From this point, by leaning sharply sideways the barrel will roll onto the shoulder as shown in Exercise 8 (b). This may seem like a lot to remember but if you practice with an empty barrel you will soon master the changes. The thing to do is to memorize well the changes before you do them and then work fast, especially after the barrel is being pulled to the knee and tossed. Louis Cyr, the great French-Canadian athlete, frequently shouldered with one hand a barrel filled with beer that weighed nearly 400 lbs.
Lifting a barrel with water in it is very difficult unless the barrel is completely filled. A great test was to half fill it with a mixture of sand and water. The way it would slop around made the handling of it twice as hard.”
Kettlebell-on-a-String Lateral Raise
Directions from Textbook of Weight-lifting (1905) by Arthur Saxon:
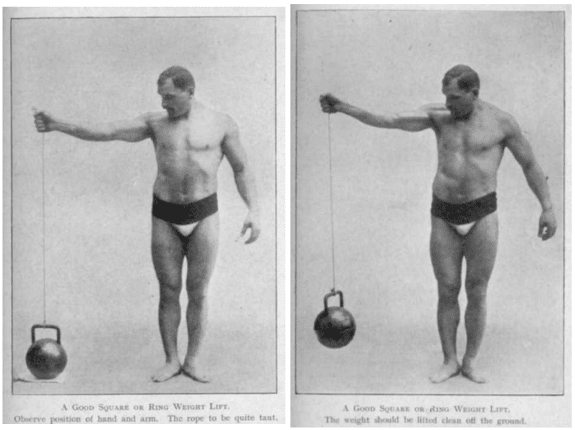
“Here is a feat which, while never likely to be included in any competition, is well worth practicing. Get a square ring or kettle weight, such as you think you can manage. Tie a rope round the handle, and then twist it round your hand in such a way that when the arm is extended level with the shoulder, the palm turned to the front, the rope will be just taut.
Now try and lift the weight from the ground in that position. I may mention that I have managed to raise 56 lbs. in this fashion, say half an inch, but the strain was tremendous. The rope must be taut, the arm horizontal with the shoulder, and the palm to the front before commencing. It sounds easy, doesn’t it? Well, try the feat and see whether it is really so. The accompanying photographs will show the positions, and the feat will be found an excellent exercise for developing strength.”
The Horizontal Equipoise of Weights
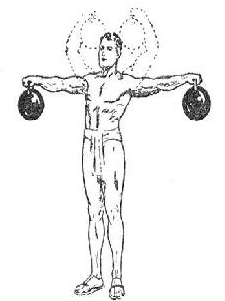
Directions from The Way to Live by George Hackenschmidt (1935):
“(Balancing weights with arms outstretched sideways.) In France this performance ranks among the classical feats of strength for athletes, and there exist definite rules for its execution:
- The arm holding the weight to form exactly a right angle with the body, rather lower than higher.
- The arm and wrist must be fully stretched.
- The body must be perfectly straight, and lean in no direction.
There are two ways of performing this feat, namely – 1. The balancing of the weight on the hand, which is the less difficult. In this case the weight is of the oblong shape used for weighing purposes, and is slightly hollowed out at the bottom, so that there is an edge. It is held so that the palm of the hand presses against this edge, while the one part of the weight rests on the wrist, and the finger-tips touch the other end. One may lift the weight with both hands to the shoulder, and press it up and then let it down into the balance, or, which is considered better style, one may raise it directly sideways into the balance. It has to be fixed for a few seconds in the proper balance before being released. The weights, according to their size and heaviness, have a width from 8 to 12 in. at the bottom. For the two-arm balance, the weights are placed with a side on the hand, so that the bottom and top of the weights are seen. In balancing, the body must not be bent backwards (which would make it easier, but which counts so many points less).”
Back
Whole Back Dumbbell Movement
Directions from Molding a Mighty Back (1932) by George F. Jowett:
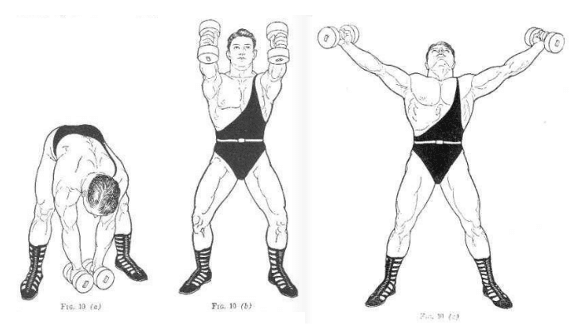
“Here is a peach for giving the entire back a workout in contraction and extension. The first time you practice it you will feel a sensation upon the breast bone and in the shoulders akin to spreading apart. It will make the cartilaginous structure of the costal region wake up a little more.
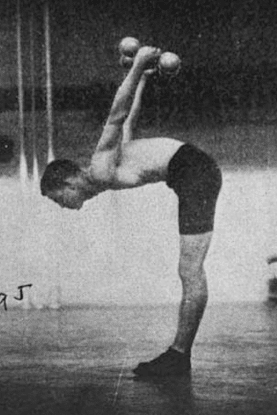
Take up your position as shown in Fig. 10 (a), with the bells placed between the feet. Be sure the feet are spread a comfortable distance apart. With a mighty heave tear them off the floor. Fig. 10 (b); breath in, and hurl them to arm’s length overhead and continue by allowing the arms to fall down and out as in a crucifix position, Fig. 10 (c).
In this exercise you really describe a complete circle by raising the weights off the floor, and throwing the arms back to give the chest and shoulders all the possible spread.
Do not bend the arms while this exercise is in process and practice it as vigorously as possible. Study the illustrations carefully, and note how the head is thrown back as the downward movement commences so that the chest spreading effort is aided the most. Do not move the feet. As the bells descend to the floor between the feet prior to making the next movement, breathe out; breathe in as you repeat the circling movement.”
Legs
Deep Knee Bend (Steinborn Method)
Directions from Super Physique Body-Building Bar-Bell Course (circa 1940s) by Siegmund Klein
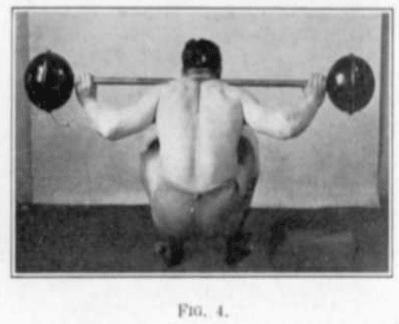
“Grasp end of bar-bell with palms facing one another as shown in Figure 1. Up-end it on a block of wood to the perpendicular. Position of hands must now be changed. The left hand grasps upper end of bar with thumb down, and back of hand as close to sphere or plates as possible; right hand at lower end of bar with thumb up, as shown in Figure 2. Stand flat-footed with feet about twelve inches apart, lower legs in line with bar, Figure 3. Squat as low as possible, rocking bell on to shoulders as shown in Figure 4. Rise to erect position, keeping the feet parallel. Again squat as low as possible, rise to erect position and repeat. To remove bell from shoulders, squat, and slowly rock bell on to block as shown in Figure 3. Rise up until bell is again perpendicular and lower to floor. The is the correct method of doing the ‘Deep-Knee-Bend’ unassisted, with a very heavy weight.”
Isometric Hip Abductor
Directions from Molding Mighty Legs (1932) by George F. Jowett:
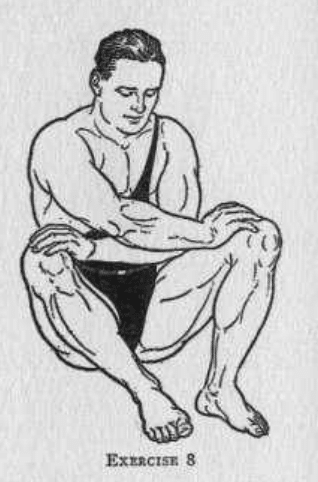
“Assume the sitting position on the floor exactly as the figure in this exercise illustrates. Cross the arms placing the right hand against the inside of the left knee. Hold the knees fairly close together, and draw the heels up towards the seat. This done, get ready for the exercise.
With all your power push with each hand against the inside of the thigh and as you do so resist the pressure of the hands by squeezing in with the knees.
The object is to spread the knees apart all you can with your hands, resisting with your thigh force. When the knees have been spread apart all they will go, slip the hands across the knees so the fingers are pulling in on the knees. Forcibly try to pull the knees together with the hands and with the thigh resist the effort, but do not exert so much leg strength as to overpower the arm pull. Bring the knees together. This done repeat the first part of the exercise. In other words the first part of the exercise you push the knees apart and in the second stage you pull them together, but in each movement you resist with the legs.
This is a corking good exercise for the muscles along the inside and the outside of the thigh. It also helps materially in building up the shoulder and breast muscles.”
Neck
Isometric Neck Extension
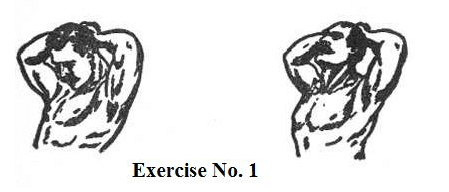
Directions from The Way to Live by George Hackenschmidt (1935):
“Stand erect with hands clasped behind your neck. Now press the head forcibly down until the chin touches the chest, exerting the full strength of your neck muscles to resist the pressure. When the chin is down force the head back by exertion of the neck muscles against the hand pressure. Repeat this alternate movement, at first for five repetitions, gradually increasing same.”
Wrestler’s Bridge
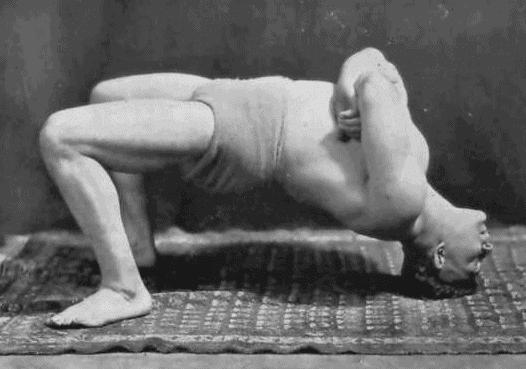
Directions from Muscle Building (1924) by Earle Liederman:
“The wrestler’s bridge is of great benefit for strengthening the neck in general. This exercise consists of resting your entire weight on the head and feet alone while the back makes an arch. By raising and lowering the hips while in this position, and by walking a few inches towards the head and back again, the neck will experience quite a variation of movements. A few minutes’ daily work in this bridging exercise will greatly help the further progress of neck development.”
Core/Full-Body
Dumbbell Windmill
Directions from Super Physique Body-Building Bar-Bell Course (circa 1940s) by Siegmund Klein:
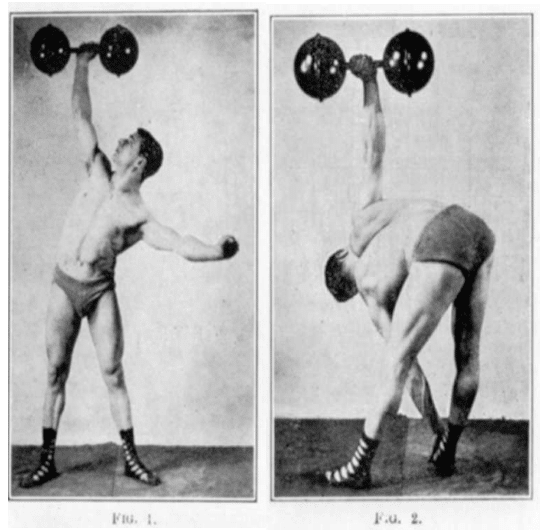
“Hold dumbbell overhead as shown in Figure 1. Spread the feet about 15 inches apart keeping both legs straight at the knees, and your gaze on the bell overhead throughout the exercise. Lower body so that the left hand touches the right foot, Figure 2. Come to erect position and repeat. When holding the dumbbell in the left hand you lower the body so that the right hand touches the left foot. Breathe in when raising body, exhale lowering.”
Side Bridge
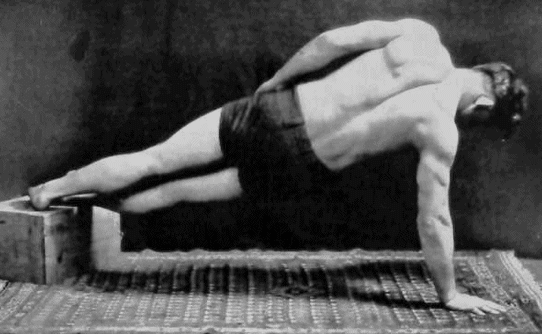
Directions from Muscle Building (1924) by Earle Liederman:
“Pushing up and down from the floor on one arm at a time is quite difficult and considerable strain is placed upon the triceps and deltoid muscles. Yet it brings into play the pectoral muscle and is an excellent means of broadening and deepening the chest.”
One-Arm Dumbbell Snatch
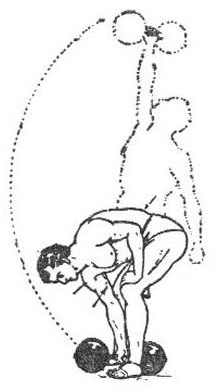
Directions from The Way to Live by George Hackenschmidt (1935):
“The one arm swing is often made with ring weights, which are swung between the legs. The Frenchman, Apollon, made a specialty of it, and could swing four weights tied together of 180 lb. total above the head. The German, Belling, was also excellent; he swung 180 lb. three times. As the swinging of ring weights requires a strong forearm and wrist, it is advisable to fasten a leather strap of two to three inch width round the wrist.”
Bent Press
Directions from Textbook of Weight-lifting (1905) by Arthur Saxon:
“This lift, which more than any other is associated with my name, cannot be described as being either an English or a Continental lift. The two-handed lift to the shoulder is certainly akin to the Continental method of getting the weight into that position ‘anyhow,’ but the lift itself is not overmuch practiced there.
On the other hand, the body press with one hand only, part of it is purely an English style of lifting, and one scarcely practiced on the Continent at all, certainly not in the competitions.
Nevertheless, despite this, it is to my mind (and this quite apart from the successes I have achieved at it) one of the best feats, if not the very best, which has even been devised. Strength, stamina, and science all enter into it in equal proportions, and the man who would make a success of the lift, a striking success that is, must necessarily be a first-class all-round lifter.
Those of you who have studied the lists of records published in the ‘Health and Strength Annual’ cannot have failed to notice that the majority of world’s record holders are distinguished for their feats at either one or a group of lifts, in which much the same muscles are called into play. That is to say, you will rarely find that a man who has eclipsed all rivals at a two-handed jerk or push has done much at single-handed lifting or snatching. In short, that these record holders are not as a rule all-round lifters.
For this reason, I would strongly advise one and all to make a special study of the ‘bent press,’ because it is an all-round lifter’s lift; and I am firmly of the opinion that, in a match, an all-round lifter (not holding any records) would always defeat, more or less easily, a world-renowned record-holder, who had gained his fame simply and solely by virtue of his success at his one pet feat.
I have already described the final stages of the bent press in my remarks on the single-handed ‘clean all the way’ lift, so have now only to deal with that portion of it in which the bell is lifted to the shoulder with both hands from an upended position.
To do this properly, the upright bell should be grasped with the right hand in the exact center, the feet being well apart (if possible, exactly in the positions they will occupy throughout the lift). Fix the right elbow, resting firmly on the hip bone in front, and grasp the bell with the left hand, immediately below the right.
Bend well forward, leaning your head right over; bend the legs well at the knees, and pull the weight over on to your shoulder.
In order to do this properly, you must lift strenuously with both hands, leaning well back and levering the bar over by the help of both your hip bones to secure and maintain your purchase, and of your shoulder, which you naturally slide as far as you can under the bar.
The hoist to the shoulder is rendered easier by the weight of the bell itself, the top sphere or discs being unsupported in any way, helping to pull the front sphere or discs upwards. A greater weight can be lifted by the bent press, if the bell be shouldered in one movement, since less energy is expended thereby; but if it will not come over at once, an additional heave becomes necessary. In order to avoid any necessity for two or three hoists (always exhausting) use as long a bar as is obtainable.
Once, however, it is fairly shouldered, the left hand can release its hold and be thrown out to adjust the balance, while the right, after steadying the bell, shifts round gradually, following the elbow as it slides round the hip bone to the back, into the proper position for the body press.
The method described above necessitates a fairly long bar for its perfectly correct performance, and other methods must be adopted with shorter ones.
The following, which may be also used with a long bar, if preferred (although I do not recommend such a procedure), is to place the feet as before (although they will very probably shift themselves subsequently in this instance), and having gripped the bar in the exact center with the right hand, to again grip it with left, but on this occasion close to the bottom sphere or disc.
Bend the knees well and, pressing the bell against the body, with the right elbow away therefrom, lift the bell up and away from the body with the left hand. As soon as it swings clear, throw, jerk, or toss it in such fashion that you can slip your shoulder well under the bar.
On no account, now, leave go with your left until you feel that the weight is secure at your shoulder and your right elbow has gained its proper position, resting on your hip bone.
From the above it will be readily recognized that this lift is performed far more easily with a long bar than with a short one, since the second method of shouldering it (necessary with the shorter implement) imposes a pretty severe strain on the lifting muscles, owing to the lack of the fulcrum secured by the right elbow resting on the hip bone, as in the first method, and to the smaller assistance derived in overbalancing the weight.
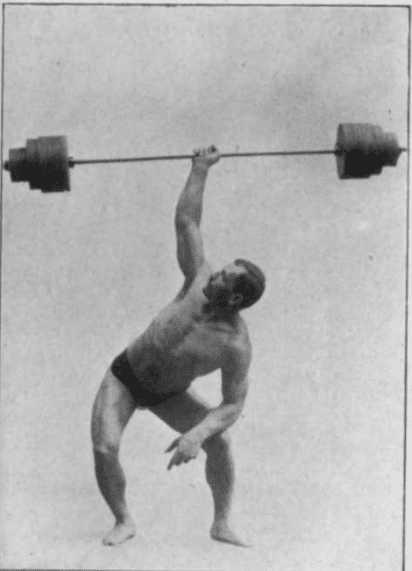
One has only to study the further stages of the lift already described to realize that the lifting muscles need to be as fresh as possible, in order to cope satisfactorily with the press itself; and cannot afford to be strained in any way by the hoisting and tossing the bell to the shoulder, necessary with a short bar.”
Tags: Exercises

