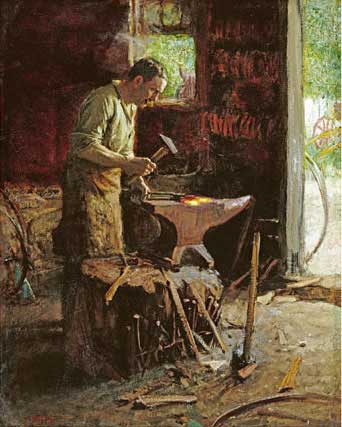
150 years ago most census records showed that a fifth of the respondents listed their occupation as blacksmith, including my 3rd great-grandfather, Roger Farrer. I don’t know what Grampa Farrer fabricated every day, but if he was like most smiths, he was making everything. Horseshoes were a small part of the job. He was more likely fabricating or repairing a farm implement, making hardware like hinges or pulleys, or even something as mundane as nails. The box of nails we buy at the hardware store for a few dollars were once made one at a time–by hand.Visit a living history site and there will be a crowd around the blacksmith. It pulls people in…How does he do that?
The methods Grampa Farrer used are essentially unchanged. I call them the Three Hs: Heating, Holding and Hitting.
Since most people don’t know a blacksmith, I get a lot of questions about the trade. Even strangers walking past my shop (the half of my garage) stop at the sound of hammers on steel and sheepishly wait for me to see them since I’m wearing hearing protection. I usually stop and answer questions, especially if there are children in the group.
“Where’s the coal?”
Many blacksmiths still use coal, and there are good reasons for it. You can get fast heats, and a skilled smith can manipulate the heat along a long piece of steel. The downside is that coal’s dirty, which is fine if you have a detached shop. I use propane because it’s clean, relatively inexpensive, and the neighbors downwind don’t need respirators.
“Where do you get steel?”

From a steelyard. We have lumberyards for lumber, and steelyards for steel. While lumberyards are fairly common in most places, steelyards are harder to find as they rarely cater to the public at large, mostly because no one in the public at large wants a 20’ piece of hot-rolled 5/8” diameter A36 steel rod. They’re usually found in industrial parks and such. Mine is a family-owned fourth-generation business, and they’re wonderfully kind to a guy who spends little money there compared to the trucker loading a flatbed with tons of steel tubing.
“How hot does it get?”
Very hot. 1400 degrees, big F. I can make it hotter or colder, but I usually keep it right around there. Welding heat and tool steel can require more heat.
Then there’s the statement: “I bet it feels really good to pound out all your frustrations…”
No, indeed. Hitting hard is part of the equation, but hitting accurately is more important. If a blacksmith is frustrated, he oughta go punch a bag until he gets over it, then go work at the anvil. More on that later.
Below I discuss the very basics of getting started in blacksmithing. You probably won’t be able to start blacksmithing right after reading this, but hopefully it will pique your interest enough to look more into this manly skill and trade. First, we’ll take a look at the basic tools you need to get started with blacksmithing. We’ll end by showing you the three fundamental ways of hitting hot metal in order to shape it.
The Tools
You need four basic things: A thing to heat your work, a thing to hold your work, a thing to put under your work, and a thing to apply forces to your work.
A Thing to Heat Your Work

Here’s my small forge.
You heat your work with a forge. Forges need fuel and air, and lots of it. Whether it’s a coke forge (coke is a material made from coal) with bellows or a propane forge with a fan, the basic idea is to apply heat to a piece of metal. Propane allows a little more control, although a master blacksmith can make a coke forge heat the work to a perfect temperature. Many (like me) use propane for its convenience and cleanliness.
You can do a lot with a smaller forge. It wastes less energy and heats more quickly. A coke forge has an advantage here as it can be scaled easily, making the fire larger or smaller depending upon your work.
A blacksmith from the 18th century would have killed for an acetylene torch. The techniques for applying heat in small areas with a forge required amazing skills and several assistants helping to position and cool the work where heat wasn’t wanted. A good torch, both for cutting and for heating, is critical. The rosebud tip on my acetylene torch puts out 40,000 BTUs. For reference, our furnace puts out 60,000 to heat our entire house. So yeah…a lot of heat in a small space. That makes isolating decorative twists in metal much easier.

An acetylene torch in action. I’m heating the metal with the torch to make a twist.
A Thing to Hold Your Work
You hold things with tongs, vises, or clamps. As my dear mentor Larry says, “If you can’t hold it, you can’t hit it.” Tongs are primary, and a good smithy (the place a blacksmith works) has many tongs for holding various shapes. A tong that’s good for a ½” square rod will fail if you try to hold a ¼” round rod. Holding a flat piece of stock requires a different tong.

Different kinds of tongs for holding different shapes of metal.
A good vise is a godsend. If you buy a vise at Home Depot, I guarantee it would disintegrate within five minutes of the abuse I pile upon my Welton. Tools are not cheap, nor should they be. In this case, I’m holding an ice chisel made for a friend.

Clamps are also critical, especially if welding something that needs to be squared and flat. Holding something square or flat is tough without a large, stable surface and a method to stabilize it.
A Thing to Put Under Your Work
The something under the work is usually the anvil. A good anvil is critical to successful work. There are $200 anvils out there, and they’re good for boat anchors or something to be dropped on roadrunners.
 My anvil cost the most of any tool I have except my Miller 251 welder, and it was a close one on that. American-forged, the Rat Hole is a fantastically designed tool. It has two holes on it, the pritchel and the hardy (sometimes hardie) hole.
A pritchel is used for punching through a piece of metal, as you need a place for the slug to go when you get through the piece of work. It stabilizes the main piece of work so it doesn’t distort too much when you start punching.
The hardy holds a number of cool tools like a V-block, useful for putting a bend in a piece of stock, like making the curvature of a leaf, etc. It can hold a swage for putting an edge on a piece of stock or making a notch in a piece of flat stock.
There is an upsetting block on the back side (a very nice feature) and of course, the horn, which is the pointy part used for curving metal.
A Thing to Hit Your Work
We’re talking hammers here. You can skimp on tools in different places, and you’ll always be sorry, but that’s doubly true with hammers and anvils. The variety of shapes, weights and head styles will become obvious shortly.
There are many more tools that make life easier and more productive, but this is an introduction. More technical stuff will come down the road, like power hammers. I love/lust power hammers.
Shaping Metal
When working with hot steel, the best analogy I’ve used is that metal becomes a lot like clay when heated. Your job is to shape it like you would clay. To make things long and skinny, you can grab a piece of clay and stretch it, and it just breaks. Unfortunately, it takes a bit more work than that to stretch a piece of metal. Steel is not Silly Putty.
You use basic forces to move your metal. To make a long, skinny piece out of a short fat piece, you squeeze the sides of the metal, and turn the work. If you take a square of clay and squeeze it on the four sides repeatedly, it eventually becomes a long, thin polygon.
There are three fundamental ways to apply force (again, there are more, but we’re keeping it simple).
Drawing Out. This is the basic idea behind the cube of clay. Hit the metal on four sides again and again and it draws out into a longer piece. One of the quintessential applications of this is to make a nail point, where you create a four-sided pyramid by repeatedly hitting and turning your work, but using the hammer to angle the tip rather than hitting it flat. This is how old blacksmiths made their nails.
Upsetting. This is applying force to the end of a piece of work to “mushroom” the metal out to add volume to a piece. If you’re making a piece that needs some heft on an end, like a wide chisel, you use upsetting.
Peining. This is applying force to move the metal in a certain direction. You can move the metal in one direction or you can spread it in all directions. If you karate chop a piece of clay, it spreads out away from your hand parallel to the axis of your hand. If you take a fist and hit it, it spreads out in all directions.
The little ball on the back of your hammer is called a ball-pein. It’s designed to move metal out in all directions. See? Useful. I use a small ball-pein hammer for riveting through two pieces of metal to tie them together. The little mushroom you see on a metal rivet is the result of a ball-pein.
There are other types of peins, like a cross-pein, to spread metal out on one axis–like karate chopping that piece of clay. If I am making a leaf on a piece of stock, I will often cross-pein it to give the leaf more width. Willow leaf: not cross-peined. Aspen leaf: cross-peined.
Let’s apply some of these simple forces. Here are a few examples.
Drawing Out:
We start with a piece of 3/8″ square stock. Get it hot.
First, we upset using a flat hammer, a pretty heavy one, 1000g, or 2.2 pounds. The larger the hammer, the greater the force applied per hit. Sledges will make short work of a small piece. Drop a ten pound weight on a piece of clay: squish. I scale the hammer to the work size.
We’ll create a nail point by drawing out.
 I had already put a twist in the work: ignore it for now. I work at the edge of the anvil here, to allow me to put a fine point on the work. I then turned the work 45 degrees and put another edge to make an octagon. Take the edges off the octagon and you have 16 edges. Continue, and you have a cone, but here I left edges to accentuate the twisting.
 It takes multiple heats sometimes, meaning you’ll have to re-heat the metal in the forge so you can keep shaping it. Don’t hit the work when it’s cold…it can create a cold shunt that weakens the work. A cold shunt is where the hot and cold parts shear and create a weak spot. That’s no bueno.
Upsetting:
This is where we add volume to an end to start something like a chisel. It’s a little tougher because tool steel requires more heat and is harder at lower temps. Simply using the weight of the piece works quite well. You can also upset at the edge of the anvil, driving metal back toward yourself. Small, not huge hits move metal better and under more control. See how it’s starting to mushroom out?

Peining:
Here I’m spreading the ends of a piece of stock to make a set of drawer pulls for my wife. A lot of the curtain rods, drawer pulls, and candlesticks in my house were made in the shop, and she wanted to have some pulls for the bathroom. I used a ball-pein here to move the metal, then smoothed it out with the flat face of a hammer.
") Then I roll over the edge, put a few bends in the work and voila, drawer pull.
Then I roll over the edge, put a few bends in the work and voila, drawer pull.
 —
—
A few other notes:
The essence of blacksmithing is not so much strength as control. Yes, you need to “get it hot and hit it hard” sometimes, especially with larger work, but the trick is to hit the metal where you want, as hard as you want as accurately as you want. When I first started working with metal more than a decade ago, my mentor drew an X on the anvil. “Hit there, move your work.” Chasing your work will result in a ruined piece or at least some cut marks, caused by hitting with the edge of a hammer and not the face.
There is a Zen-like beauty to having that sort of power and at the same time, that sort of control. Like everything worthwhile, it comes with time and practice. If your mind is cluttered, turn off the forge, clean your shop, and go back in the house. Clear mind means good work. I can tell when I make something if I was distracted. It goes in the scrap bucket for another day. Which leads me to…
There are no mistakes. Unlike wood, where you can cut it three times and it’s still too short, metal is recyclable. If a piece is botched, wait and give it another chance.
I once made a drive hook, a combination nail and hook that log cabin dwellers used to hang up their stuff. I realized when I had finished it that the nail was facing the hook. Worthless, I threw it on the ground and walked out into the cool night air. I was beating myself up for a lack of mindfulness. My wise and loving mentor, Larry, walked outside and stood with me for a moment. “There are no mistakes,” he said in his lovely Alabama drawl. We went inside, he heated the hook with a torch and gave it a few twists, ending with the nail pointing in the proper direction. It was actually more beautiful than the original.
There are no mistakes. And there are second chances, in metal and in men.
P.S. Some of the pictures here show a mess. Ignore it, please. It’s not always like that. My shop ends at the anvil.
P.P.S Like I said at the beginning, this was a very basic primer. I plan on following up with specifics in later posts. That is, if you all are interested.