The use of wax seals largely disappeared along with the popularity of handwritten correspondence. But judging by the surprising number of sealed envelopes I receive from AoM readers, the practice has certainly not died out completely among those who still practice the art of letter writing. The appeal? They add an element of distinction to your correspondence, and, perhaps just as importantly, give you a chance to play with fire! If you’ve ever been curious about wax seals, today we’ll cover everything on the subject from their history to how to make them yourself.
The History of Wax Seals
The use of seals can be traced all the way back to the world’s first civilizations, and have been found from Mesopotamia to the Indus Valley. These first seals were made with clay that was impressed with engraved cylinders or rings.
The use of wax seals, however, did not begin until the Middle Ages. At first they were the exclusive purview of monarchs, bishops, and royal courts for use in issuing official decrees and authenticating documents. The use of wax seals then gradually became more democratized, spreading from aristocrats, to monasteries and guilds (for example, butchers would sign agreements with a seal bearing the image of a hog or cow), and eventually to ordinary freemen by the 13th century. Each individual had their own seal, and in a time when many were illiterate, they were used in place of a signature to authenticate agreements, contracts, wills, letters which conferred rights or privileges – any act executed in someone’s name.
Utilized in this official capacity, seals were sometimes placed directly on the document but were most often attached in the “pendent style.” The seal was applied to a cord, ribbon, or strip of parchment and hung loose after being threaded through a hole or slot at the lower edge of the document.
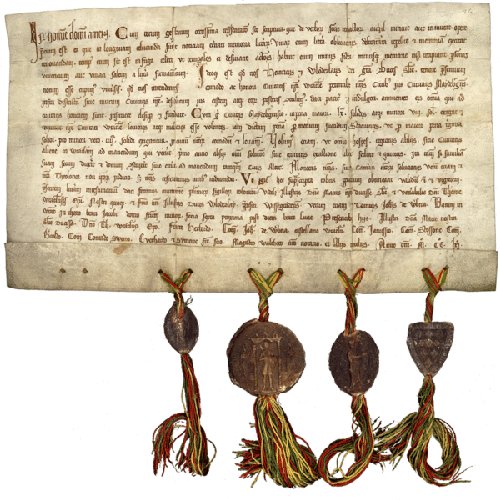
Seals hung in the pendent style from a charter of privileges for the town of Wrocław (Silesia), granted by Duke Henry III in 1261.
The wax itself was made with 2/3 beeswax and 1/3 resin, a ratio that shifted almost entirely to the latter in the post-medieval period. The Pope would seal his documents with a bulla – a lump of lead, which eventually gave these documents their name – papal bulls.
Red (colored with the mineral cinnabar) and black (made with the soot from burning pure resin) were the most common colors, but a variety of hues existed from gold (yellow mica) to blue (powdered cobalt glass). Some royal courts used different colors to distinguish various administrative functions.
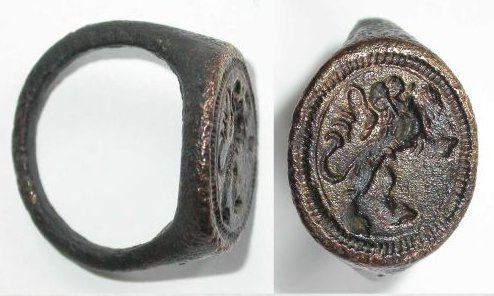
The wax was pressed with a handheld seal or with a signet ring. The latter, which can be traced all the way back to ancient Egypt, was a symbol of authority and power and used by the higher ups both in the aristocracy and the Church. Thus the signet ring of a dignitary was frequently kissed by a diplomat or visitor as a sign of allegiance or submission.
Seals of either kind bore a graphic emblem in the center, and featured a heraldic motif, an image of the bearer himself, or in the case of ecclesiastical uses, a saint. Circling the emblem was the seal’s “legend” – often simply “The seal of [the name of the owner]” in Latin or vernacular — or sometimes the owner’s motto.
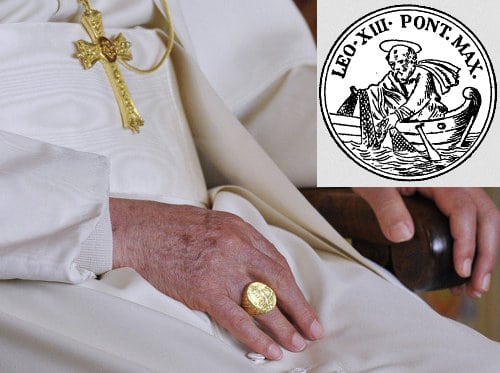
Because seals were symbols of power and were used to authenticate a person’s wishes, they were typically destroyed after the owner died to prevent posthumous forgeries. For example, when a Pope dies (and after writing this last week, I should now add “or abdicates!”), the Camerlengo’s first duty is to ceremonially destroy his “Ring of the Fisherman” in front of his fellow cardinals. This signet ring was used by the Holy Father from at least the 13th century until 1842 to first seal private correspondence and then papal briefs. Post-1842 the seal was replaced by a red ink stamp, but a new Fisherman ring is still cast in gold for each incoming Pope.
The fate of the Pope’s Fisherman’s seal would be shared by most other seals used in an official capacity. Except for occasional ceremonial use, modern governments have almost entirely replaced wax seals with the rubber stamp and ink variety.
Wax Seals in Private Correspondence
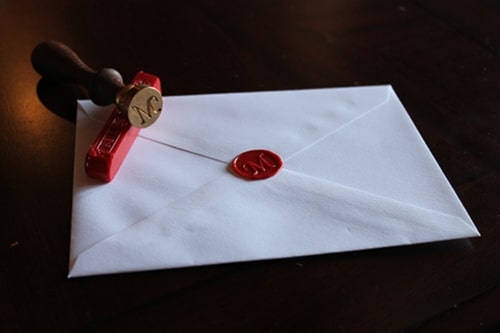
Using a wax seal in the way we often think of today — to keep a letter closed, ensure it hasn’t been tampered with, and confirm it was indeed written by the supposed sender – was practiced in the Middle Ages, but did not really take off until the post-medieval period. As travel, emigration, and colonization increased, wax seals were not simply applied to keep communication confidential, but as a practical necessity. Before the British and American postal reforms of the mid-19th century, sending a letter was quite expensive; it cost 25 cents in the US to send a letter over 450 miles – quite a sum in those days. Furthermore, postage was based on distance and number of sheets. An envelope would have counted as an additional sheet – doubling the cost – so letter writers used as much of a single piece of paper as possible and then sealed it shut with wax or paste to avoid the extra expense. Envelopes were considered a frivolous luxury.
You can still skip the envelope today by folding and then sealing a piece of paper. Here’s one folding method.
After postal reforms significantly reduced the cost of postage and changed their basis from the number of sheets to overall weight, letter writing became much more accessible to the masses. The volume of letters mailed increased fivefold, and along with this boom, a burgeoning envelope industry emerged. At first they were handmade by stationary clerks, 25 at a time, but these painstakingly assembled envelopes did not include adhesive…the stationery stores also sold sealing wax! The death knell for wax seals did not come until the latter half of the 19th century, as automatic envelope folding machines, and more importantly, pre-gummed envelopes, were developed. With a couple of licks, a letter could be sealed inside an envelope and sent on its way.
Today, using wax seals is as unnecessary as handwritten correspondence, and yet like many old traditions, it is pleasurable to practice, and adds a bit of personal distinction and panache to your communication.
If you’re interested in creating wax seals like the knights of yore, read on, good sir!
What You Need to Create a Wax Seal
- Fire source (matches, lighter, etc.)
- Wax
- Seal
Choosing Your Wax
Wax Type
The wax types available today mainly differ as to their flexibility or suppleness. Modern wax companies have tinkered with the formulas of old in order to create seals that can make it through the machinated processing used by today’s postal service.
On one end of the spectrum you have traditional wax, made similarly to the wax of centuries past. Traditional wax was designed to preserve confidentially, and thus dries hard, and breaks when you tamper with it. The upside here is authenticity, the downside is that the receiver may not like dealing with the little pieces that break off, and you can’t send this type of seal through the mail (see section “Will My Seal Make It Through the Mail?” below).
On the other end you have seals that are made with a glue gun or even come pre-made with adhesive. These look plastic-y, are very supple and easy to apply, and are designed for mass mailings like wedding invitations. For obvious reasons (using a glue gun, the disappearance of the most fun thing about seals – playing with fire), this type of wax is not recommended.
In the middle are waxes that look close to the traditional variety, but have been formulated to be more flexible so that they can survive mailing.
It may be possible to use regular candle wax, by the way, but because it lacks resin, candle wax will not stick as well on the paper, nor hold up to much handling. It’s not recommended.
Wicked vs Wickless Wax
Traditional and flexible waxes typically come in stick form, with or without a built-in wick. Wickless is the most traditional; wicked the most convenient. With a wickless stick, you must hold the stick of wax in one hand, and the match or fire source in the other, keeping it close to melt the wax. With a wicked stick you simply light the end, and then let the flame go to work in melting the wax. The downside of the wicked stick is that they’re slower in melting the wax and can produce more soot residue, which creates a marbling appearance in your seal that you may or may not like. The downside of the wickless stick, particularly in a traditional variety, is that it takes longer to melt the wax than it does for the match to burn down to your fingers. And the wax can drip onto a disposable lighter. In fact, wax seal enthusiasts actually recommend using a butane torch lighter with traditional wickless sticks to avoid these problems — not a move the amateur sealist will likely take.
You don’t have to go either or on sealing waxes. Use a flexible wax when sending things through the mail, and traditional wax for hand-delivered notes or decorative purposes.
Wax Color
Once you choose the type of wax you want to use, you must choose its color. Red and black are the most traditional for men. In 1891’s Letter-writing: Its Ethics and Etiquette, with Remarks on the Proper Use of Monograms, Crests, and Seals, Arthur Wentworth Hamilton Eaton opines that “no other color but black and red are good form,” and that black is an appropriate color for mourning-related correspondence.
That being said, if you’d like to let your wax seal freak flag fly with green or blue, you go right ahead. You can also do a bi-color seal, by pressing your stamp first into gold or silver “ink” and then into the wax, but I’d say this is a little too fancy pants for a manly letter writer.
My Wax Recommendation
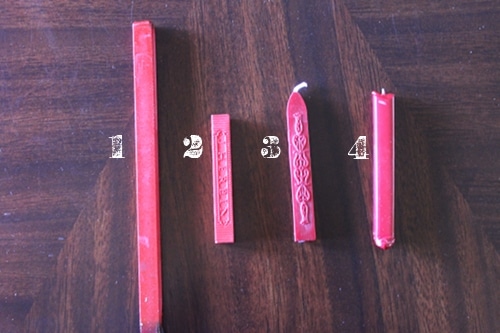
1) J. Herbin traditional wickless wax, 2) J. Herbin supple wickless wax, 3) Nostalgic Impressions flexible wicked wax, 4) Nostalgic Impressions traditional wicked wax
In research for this post I bought four kinds of wax to try: a traditional wickless wax and a supple wax from J. Herbin, and a traditional wicked wax and flexible wicked wax from Nostalgic Impressions.
Both of the Nostalgic Impressions’ wicked waxes were decent, easy to use, and made nice-looking seals. However, they did produce more soot, and had a tendency to drop flaming pieces of wax onto my envelopes.
I had no luck with the J. Herbin traditional wax – the wax would not melt before even the flame of a long kitchen match had reached my fingers.
My favorite turned out to be the J. Herbin wickless supple wax. While J. Herbin has been around since 1670, I was admittedly skeptical that this wax’s price, twice that of the Nostalgic Impressions flexible wax, would be worth it. But it burned easily with a kitchen match, and produced a rich, really smooth, soot-less seal that made it through the mail like a champ (see below).
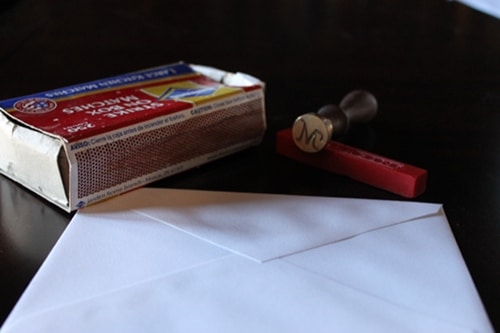
Choosing a Wax Seal Stamp
Most seal stamps these days are made with a metal seal – often brass — attached to a handle; the seal can be removed and switched for another. Signet rings (traditionally engraved with a family crest or coat of arms and worn on the left pinky) are also available, but I’d feel a little silly getting one myself unless I had truly descended from some aristocratic Old World family. Although if you do get one, be sure to make guests kiss it when they enter your home.
A variety of seal shapes are available; the circle is the most traditional for men, while the oval shape has classically been the domain of the ladies.
What kind of design should you get on your seal? Again, far be it for me to stop you from getting a dolphin, but traditionally, the accepted designs for a man’s seal were the first letter of his surname, a monogram, or a family crest — if you are fortunate enough to have one. That being said, companies can make custom designs, so the sky is the limit. For correspondence that will circulate amongst the members of a club or lodge, a symbol of the group, like a skull, would be quite appropriate.
When Should I Use a Wax Seal?
Wax seals lend an air of dignity, formality, and distinction to your letters, so use them when that weight is suiting and people will appreciate the touch of personality. They are appropriate for personal correspondence to family and friends, for contacting a traditionally-minded entity like the Art of Manliness, or for inviting someone into a fraternity. They are also definitely a go for love letters, whether left on her pillow or sent through the mail. But affixing one to the check for your water bill, a complaint about your dinner sent to Applebee’s corporate headquarters, or a thank you note for a job interview, may make you seem more pretentious and/or weird than suave.
Will My Wax Seals Make It Through the Mail?
I mailed six letters across state lines to see how well three of the waxes I procured would perform when sent through the first-class mail service. I sent two letters each with seals from the J. Herbin wickless supple wax, the Nostalgic Impressions traditional wicked wax, and the NI flexible wicked wax. For each pair, I asked that one be “hand canceled,” where the stamp is canceled by hand – thus bypassing one of the machines the envelope must pass through on its way to its destination. Here are the results:
- J. Herbin supple wickless wax: intact
- J. Herbin supple wickless wax + hand cancel: intact, one edge smooshed
- NI wicked flexible wax: intact
- NI wicked flexible wax + hand cancel: intact, missing an edge
- NI traditional wicked wax: missing 1/3 of seal
- NI traditional wicked wax + hand cancel: missing 2/3 of seal
So basically, both the J. Herbin and NI flexible seals did well, but traditional wax shouldn’t be sent through the mail (which isn’t recommend anyway, but I figured I’d try), and, surprisingly for some reason, having a letter hand canceled causes more damage to the seal, not less! (I have heard that post offices have widely varying policies on hand canceling, and some don’t actually do it, even when you ask them to.)
When sending a seal through the mail, try to make the seal thinner and uniform, so that edges do not get caught and snagged by machines.
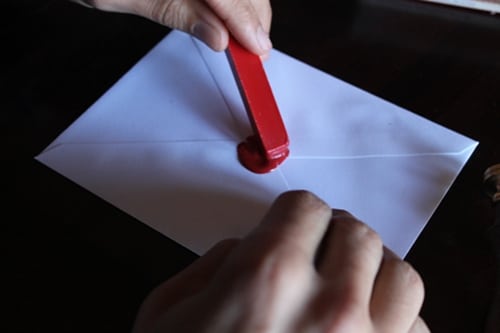
How to Make a Wax Seal
If you’re a beginner, you may want to trace your seal on the envelope/paper before you begin so you have a nice target for your wax drips.

Melt the wax. If using a wickless stick, hold the stick in one hand and the match right at the end of the stick in the other. Place the match and the stick directly over the spot you want to make the wax seal and let the wax drip down.
If using a wicked stick, light the stick and give it a moment to burn. Hold the stick at about a 45 degree angle to your paper, and let the wax drip down.
Allow the wax to drip into a puddle that’s around the size of your seal. Getting black soot in your wax, especially if you’re using a wicked stick, is normal. Some folks like the marbleized appearance the soot lends to darker waxes, but if you wish to minimize it, stirring and smoothing the wax as outlined in the next step can help.
Stir and shape the wax. Using the end of the wax stick (the non-wicked side if you’re using a wicked stick), stir and shape the wax puddle to bring out any air bubbles, give it a uniform thickness, and mold it into the shape and size of your seal.
Create a moisture barrier. If you don’t create a moisture barrier on the seal before you press it into the wax, the hot wax can get stuck on the seal (this is more of a problem with traditional versus flexible waxes). So breathe, lick, or dab the seal on a moistened sponge before plunging it into the wax.
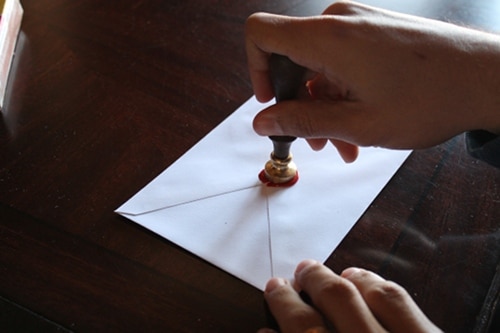
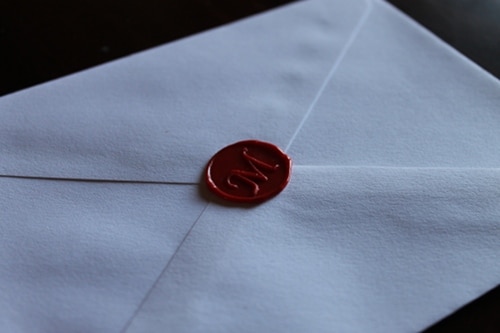
Press the seal into the wax. Make sure the letter/design of your seal is right side up. Press your seal firmly into the wax, hold it there for 5-10 seconds as the wax cools and hardens, and then gently remove it. If you meet resistance when trying to pull it up, let it cool further.
Use care. You are playing with fire here, so be careful not to hold the flame too close to the paper, and be aware of flaming drips of wax that can drop from the stick.
Creating wax seals is admittedly pretty fun. Give it a try!