Editor’s Note: This is a guest post from Josh Tucker.
“Give me six hours to chop down a tree and I will spend the first four sharpening the axe.”
–Abraham Lincoln
Whether Honest Abe used his axe as a potent metaphor to illustrate the primacy of preparation or as his trusted weapon in a covert campaign against vampires, he knew one thing…a sharp axe is the manliest tool. And, like all aspects of manliness, sharpening an axe requires persistence, patience, and knowledge passed down from one’s predecessors.
This article will teach you how to customize any axe into a tool fit for the Illinois Railsplitter himself. I encourage you to try to find an heirloom axe to restore. With the success of Gransfors Bruks, boutique axes have mushroomed in popularity over the last decade or so. If you are lucky enough to compare a Gransfors, a Wetterlings, a Council Tool, or any of the other available high quality axes to the generic trunk-slapper available at your nearby hardware store, you will be amazed at the cutting ability of even a small camping axe.
Any of those axes are a fine investment for a man who spends time in the woods, or even just the suburban yard. Or just wants to own the second most important tool, after a good sharp knife, that a man can have. But I find special pleasure in finding and restoring the keen edge of an antique axe. I would wager that a significant portion of men reading this article either already own or could easily procure an axe with a meaningful personal history. If you poke around whatever woodshop, tool shed, or garage you have access to, you are likely to find an antique axe in the corner somewhere.
If you can find an axe that means something to you, then thank your fortune and keep reading. If not, check out your local flea market or junk store. You can often find an ugly duckling axe just waiting for a gentleman to restore to its true beauty. The prices here are usually borderline larceny. For less than $10, you can frequently find the source material for an axe that will rival a $188 Gransfors Bruks Felling Axe.
This is not to say that a boutique axe is not worth the money. I own both a Granfors Bruks hatchet and a Council Tool camp axe. Each are remarkably well-made tools. They are joys to use. However, the process that I outline here will take them to another level, too.

From left to right – a Council Tool Velvicut Hudson Bay style canoe axe with a custom sheath, an antique felling axe with a new handle, an antique L.L. Bean canoe axe with a new handle, and a Gransfors Bruks wildlife hatchet.
Things to Look for When Selecting an Axe to Restore
1. Is there still life in the bit?
The most important consideration in deciding if an antique axe is a candidate for restoration is to make sure there is life in the bit. The bit is the “blade” of the axe, the part that either is or is supposed to be sharp. Preferably, axe heads are manufactured in two parts. The bit is the part that slices the wood fibers and, consequently, must be hard enough to cut without being too brittle to chip. The rest of the axe head should be soft and pliable enough to absorb the shock waves emanating from a solid strike to an osage stump or a vampire thorax.
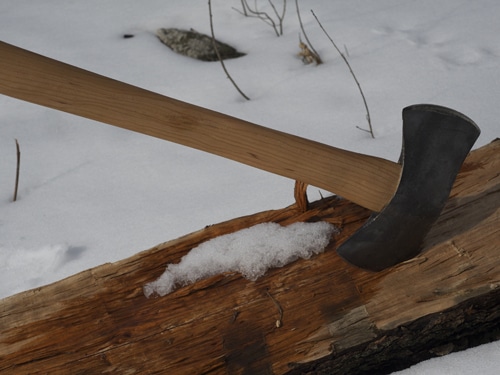
A worthy candidate for restoration will include plenty of unmolested bit with which to work. I have taken an antique axe and treated it with a vinegar bath to show you a great candidate for restoration. Notice how there is plenty of the hard bit steel to work with and notice how it allows for a continuous edge from the “poll,” the hammer side of the axe, all the way to the bit.

Hudson Bay axe with vinegar treatment
Below is an example of a double-bit axe whose bit is too far gone to bother with. Notice how the bit edge is too stumpy to create a consistent edge all the way through the axe. It should be obvious that this bit is simply worn out. Too much hard steel has been removed from the edge to make this axe worth the investment of your time and your pride.

Double bit that is worn out
2. What’s the pitting like on the axe head?
Next look to the pitting of the axe head. Time conquers all, even the perfect beauty of an axe. Pitting is built up rust that divots the surface of the axe head and gives it the complexion of Manuel Noriega. If you were to design the perfect axe, that axe would be as smooth as a cue ball. Just like swimmers prefer the slickest wetsuits, axe men prefer the smoothest axe head. It reduces friction and improves cutting.
Do not go nuts here. During a manic bout of self-improvement, Benjamin Franklin convinced himself that a mirror-finished axe would make a fine example of his moral vigor. He paid a blacksmith to shine his axe and the smith agreed so long as Ben was willing to turn the stone with his own leg power. After hours of peddling like Fred Flintstone, Ben decided that pock-marks do indeed give an axe a bit of character.
If Ben Franklin wielded a speckled axe then there is no shame in you doing so, too.
3. What shape is the handle in?
Finally, examine the handle. This is the least important consideration. A brittle or loose handle is easily remedied by replacing the handle. If the handle feels sturdy in the axe head and the head does not slip around on the handle, examine further. If the handle is wood, look at the grain of the wood. Ideally, the grain will be narrow and running in the same direction as the axe head. Some authorities report that the straighter the grain of the handle, the stronger it is.

Swell of the GB hatchet

Swell of CT canoe axe
Sharpening Your Axe
I would advise that you stick with any handle that is snugly affixed to the axe head. If the head wiggles even a bit, however, it is a potential danger and should be replaced.
Once you have a suitable axe on which to do-do some sharpening voodoo, the first step is to gather your tools.
You will need:
- A double-cut mill bastard file. 8 or 10 inches is a good size. If you are refinishing a hatchet, a smaller file is appropriate.
- A dust mask for sanding and sturdy gloves
- Linseed oil
- 3 sheets each of course, medium, and fine grit sandpaper. 80, 220, and 400 is a good selection. If your local hardware store has wet/dry automotive sandpaper, get it.
- A bucket or other waterproof vessel that will hold the axe head. You want something that is as small as possible while still being large enough to accommodate the axe head. You also want it to be sturdy enough to be freestanding while holding liquid.
- A basic C-clamp large enough to secure the head of the axe to a countertop or bench.
- Two rags or some paper towels
Many men will have some of these supplies lying around the house. If you do need to pick up material from the local hardware store, I have purposefully kept this list as spartan as possible. The most important items are a good file and a clamp to secure the axe head. You can do a creditable job using only these two items.
Step 1: Soak the Axe Head in Linseed Oil
With your tools gathered, you can now begin. If your axe has a wooden handle, I recommend that you place it upside down in a bucket or other vessel and pour in enough linseed oil to cover the axe head. This step is not necessary so long as your axe handle is firmly secured in the head. It is, however, beneficial in any instance. The wood inside the eye will soak up the linseed oil and swell, creating a tight bond between the head and handle.
If you can, let the axe soak in the linseed oil bath for at least a day or two and as long as a week. Please remember that linseed oil is flammable and not pleasant to clean up. Be careful of fires, be they a flame or a spouse angry at the mess you made in the garage.
After you are done soaking the axe, let it dry for at least a day and as long as three or four days.
Step 2: Sand the Axe Head
After it dries, you can sand the axehead if you want. You will need to sand any rust off. Other than that, however, the choice of sanding the head is largely a matter of aesthetics. Theoretically, a smoother axe is a better performing axe, but in practice, I do not think it makes a tremendous difference.
If you want to sand it, start with your coarsest sandpaper. I find that folding a sheet of sandpaper and then ripping it into small squares of 3″ by 3″ is the easiest way to do this. Sand the axe face in one direction only, going back and forth horizontally from the poll (the hammer end of the axe) to close to the bit (the edge). Work your way from the coarsest sandpaper you have up to the finest until you like the results.

Sandpaper selection
This will create a bit of a mess. Be sure to wear a dust mask so you do not breathe in any steel or rust particles. Also, put a drop cloth down if you are doing this in your living room, like I am here, lest you want to face the wrath of girlfriend and her vacuum.
Step 4: Sharpen
NOW you are ready to put an edge on the axe that would delight the Great Emancipator. Here goes.
First, find a counter or a workbench and lay the poll close to the edge. You want to let the bit of the axe extend as far as possible into empty space so that you can file the edge easily. Now clamp the poll end tightly to the counter. Try to snug it tightly enough that the axe will not wiggle.

Axe clamped to the counter
First envision in your mind what you are going to do. Most men think that sharpening an axe or knife is all about fiddling with the leading edge. There is a clinical term for this opinion: Dead Wrong.
The geometry behind the edge is the key to a surgical edge on either a knife or an axe. With an axe, you want to create a consistent bevel from the cutting edge into the axe head, on as narrow an angle as possible. The narrower the V, the deeper the axe will cut.
I like to hold my file at about a 10 degree angle. When you double this, you will get a 20 degree bevel on the axe. This is a little narrower than is usually recommended, but I have an extra step beyond the usual.

Filing the axe
Focus on creating a straight line from a point about 1 to 1 1/2 inches back on the face of the axe all the way to the bit. You can see the transition in these photos.

Beginning bevel

Transition bevel

Finished bevel
Also, please wear sturdy gloves while you are doing this. I am not doing so in the photos and, frankly, that is dumb.
This may or may not take awhile. If it does, just know that it is the most important step.
After you have corrected the bit geometry on both sides, you are ready to set the keen edge. Paradoxically, you will be blunting the cutting edge of the axe. Put your file at about an angle between 15 and 20 degrees and file just the cutting edge on both sides of the axe. By doing this you will create a thicker cutting edge which is a little bit less sharp than the 20 degree edge you had before.

Brawny edge taken from above
By putting a steeper angle on the cutting edge, you make the bit resilient to chipping and nicks. The axe will require less sharpening and will perform better on the hardwoods that are found in much of North America. Remember, this is not a scalpel. It is a steel wedge that you will be slamming into knotty wood. Hone accordingly.
Step 5: Sand the Axe Handle
If your axe handle is fiberglass, you are done. If, however, it is wood – and it should be wood — then you are ready for the last aspect of doctoring your axe. You will want to sand the handle in the same fashion you did with the axe head. Using small squares of sandpaper, start with your coarsest grit and work up to your finest. I find that this is highly rewarding. I like throwing off sawdust and really learning the shape of the handle with my hands.
After working up to your finest grit, liberally wet a paper towel or rag and rub down the handle. This will clean off all the sawdust that clings to the handle. But even better, this will raise up burrs on the wood as the handle dries. Once dry, work the handle over again with your finest sandpaper. By doing this, you will save yourself from blisters when the sweat from your hands wets the handle later.

Burrs on axe handle
You can repeat this step if you want to make the handle shockingly smooth. It is a matter of preference. Some people like a bit of texture on the swell (the knob at the end of the handle) and will now use their coarsest paper to rough it up a bit. I prefer a silky smooth handle and find that the swell itself gives me enough control over the axe that I do not have any problems with my grip.
Step 6: Rub the Axe with Oil
Now for the last step. Take a clean, dry rag or paper towel and wipe down the axe head and handle. Now apply linseed oil to the rag and rub down the entire axe. If you do not have linseed oil, just about any non-petroleum oil you have laying around will work. Canola, safflower, olive, etc. will all be fine. The important thing here is that the steel and especially the wood soak up oil so they will repel water and protect the integrity of the axe.

Oiling the axe
You could even heat up some lard or bacon fat and use that if you wanted the porcine dream of axes.
Let the oil dry. It isn’t a bad idea to put several coats on the handle. You will probably be so proud of your axe that you will find yourself repeatedly picking it up for no real good reason. Or maybe that is just me. In any case, you will want the handle to soak up at much oil as possible.

Finished axe
So there you have it. I hope that this article inspires you to get and use a quality axe, whether you decide to restore one or purchase any of the great options available now. There is something primal about using an axe and the difference between a sharp axe and the axes most men have used is truly startling.
Stay manly and stay safe.